How to Knit a Classic V-Neck Vest: Complete Beginner-Friendly Pattern Guide
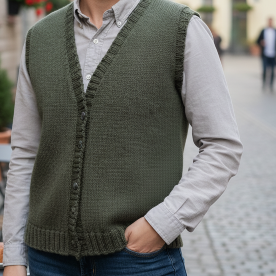
Looking for a versatile knitting project that’s both stylish and practical? This classic V-neck button-up vest pattern is perfect for knitters ready to tackle an intermediate project. Whether you’re knitting for yourself or creating a handmade gift, this timeless wardrobe staple works beautifully as a layering piece for any season.
What You’ll Create: Project Overview
This top-down knitted vest features elegant V-neck shaping, front button closure, and ribbed finishing details. The pattern uses a straightforward stockinette stitch body with garter stitch edging, making it accessible for knitters comfortable with basic increases and decreases.
Skill Level: Intermediate
Construction Method: Top-down, knit flat and seamed
Estimated Time: 20-40 hours depending on size and experience
Size Options and Finished Measurements
This versatile vest pattern includes six sizes to fit a wide range of body types:
| Size | Chest Measurement | Full Length |
|---|---|---|
| S | 88 cm (34⅝”) | 57 cm (22½”) |
| M | 96 cm (37¾”) | 59 cm (23¼”) |
| L | 106 cm (41¾”) | 61 cm (24″) |
| XL | 116 cm (45¾”) | 63 cm (24¾”) |
| XXL | 126 cm (49½”) | 65 cm (25½”) |
| XXXL | 138 cm (54¼”) | 67 cm (26⅜”) |
Sizing Tip: Choose a size with 5-10 cm (2-4″) of positive ease for a comfortable, layering-friendly fit.
Materials Needed for Your Knitted Vest
Yarn Requirements
This pattern is designed for Yarn Group B weight yarn (DK/Light Worsted). You have two excellent options:
Option 1: KARISMA by Garnstudio
- Amount: 300-500g (varies by size)
- Color: #57 Olive
- A durable, washable wool blend perfect for everyday wear
Option 2: SOFT TWEED by Garnstudio
- Amount: 250-400g (varies by size)
- Color: #17 Spinach Pie
- Adds beautiful texture and rustic charm
Yarn Substitutions: Any DK or light worsted weight yarn that matches the gauge will work. Consider cotton blends for warmer weather or pure wool for extra warmth.
Needles and Notions
Circular Needles Required:
- Size 4mm (US 6): 80cm (32″) length for body in stockinette stitch
- Size 3mm (US 2.5): Both 40cm (16″) and 80cm (32″) lengths for ribbed edging
Additional Supplies:
- 6 buttons (approximately 15-20mm diameter)
- Stitch markers (2)
- Tapestry needle for seaming
- Scissors
Needle Size Note: Gauge is crucial for proper fit. Always swatch and adjust needle size if needed.
Essential Gauge Information
Achieving the correct gauge ensures your finished vest will fit as intended.
Target Gauge: 21 stitches × 28 rows = 10 × 10 cm (4″ × 4″) in stockinette stitch using 4mm needles
How to Check Your Gauge:
- Cast on 30 stitches with 4mm needles
- Work stockinette stitch for 12 cm (5″)
- Measure a 10cm square in the center
- Count stitches horizontally and rows vertically
Troubleshooting:
- Too many stitches per 10cm? Use larger needles
- Too few stitches per 10cm? Use smaller needles
Pattern Techniques and Special Instructions
Key Stitch Patterns
Garter Stitch (worked flat): Knit every row. One ridge equals 2 knitted rows.
Stockinette Stitch (worked flat): Right side (RS): Knit all stitches
Wrong side (WS): Purl all stitches
K2P2 Rib: Knit 2 stitches, purl 2 stitches, repeat across row
V-Neck Increases
To create the signature V-neck shaping, you’ll make yarn over increases:
- Work to the increase point
- Bring yarn forward, wrap over right needle
- On the next row, knit the yarn over through the back loop to avoid holes
- Increase alternately every 2nd and 4th row for gradual shaping
Armhole Shaping Technique
Armholes are shaped using a combination of:
- Increases worked at the beginning/end of right-side rows
- Cast-on stitches added at the end of rows
- The number of increases varies by size for proper fit
Side Decreases for Waist Shaping
Decreases are worked on both sides of marked stitches:
- Work to 3 stitches before marker
- K2tog, K2 (including marked stitch)
- Slip 1 knitwise, K1, pass slipped stitch over
- This creates a neat, mirrored decrease line
Professional Buttonhole Placement
Six evenly-spaced buttonholes are worked on the right front band:
- First buttonhole: 2cm (¾”) from bottom edge
- Last buttonhole: 1cm (⅜”) from V-neck start
- Remaining 4 buttonholes: Evenly spaced between
- Spacing: Approximately 6-7cm (2⅜”-2¾”) apart depending on size
Buttonhole Method: On right-side row: P2tog, yarn over
On wrong-side row: Knit the yarn over to create hole
Visual Schematic and Construction Diagram
Before beginning your vest, familiarize yourself with the schematic below. This diagram shows the complete construction from a top-down perspective, with all measurements provided for each size.

Figure 1: Complete Vest Schematic
All measurements shown in centimeters. The arrow indicates knitting direction (top-down construction). Refer to this diagram throughout the pattern to visualize how pieces connect and to verify your measurements as you work.
Understanding the Schematic
The diagram illustrates:
- Front pieces with V-neck shaping and button band placement
- Back piece showing shoulder and neck construction
- Armhole placement and underarm cast-on locations
- Body shaping with waist decreases
- Finished measurements for each size clearly marked
Keep this schematic handy as you knit—it serves as your visual roadmap for the entire project.
Step-by-Step Knitting Instructions
Phase 1: Knitting the Front Pieces
Right Front Piece
- Cast on 20-23 stitches (varies by size) using 4mm needles
- Work 1 edge stitch in garter stitch, stockinette to last stitch, 1 edge stitch in garter stitch
- At 4-7cm length (varies by size), begin V-neck increases inside last 2 stitches on RS rows
- Increase alternately every 2nd and 4th row, 19-21 times total
- At 16-18cm length, begin armhole shaping with increases and cast-ons
- Set aside and begin left front
Left Front Piece
Follow the same process as right front, with these key differences:
- V-neck increases worked inside first 2 stitches (opposite edge)
- Armhole shaping worked on opposite edge
- Mirror the construction of the right front
Phase 2: Knitting the Back Piece
The back is worked in two separate shoulders, then joined:
Right Shoulder
- Cast on 20-23 stitches
- Work 1 edge stitch in garter, stockinette center, 1 edge stitch in garter
- At 4cm, increase 1 stitch inside first 2 stitches on RS row
- Work 1 return row, set aside
Left Shoulder
- Work exactly as right shoulder
- At 4cm, increase inside last 2 stitches (opposite side)
- Work 1 return row
Joining Shoulders
- Work across left shoulder stitches
- Cast on 36-40 stitches for back neck (varies by size)
- Work across right shoulder stitches
- Continue in stockinette with garter edge stitches
- At same length as fronts, work armhole shaping on both sides
Phase 3: Joining All Pieces for the Body
When all pieces reach the armhole completion:
- Starting from RS, work left front piece
- Cast on 11-15 underarm stitches (varies by size)
- Work across all back stitches
- Cast on 11-15 underarm stitches
- Work across right front piece
- Place markers in center of underarm cast-on stitches
This is your new measuring point for the body!
Continue V-neck increases until complete. You’ll have 186-290 total stitches depending on size.
Phase 4: Body Shaping and Ribbed Hem
- At 5cm from join, decrease 4 stitches (one on each side of both markers)
- Repeat decreases every 9-11cm, 4 times total
- At 34-39cm body length, work increase row evenly across
- Switch to 3mm needles
- Work K2P2 rib for 4cm
- Bind off in pattern
Binding Off Tip: Use a larger needle or add periodic yarn overs while binding off to prevent tight edges.
Phase 5: Finishing the Vest
Shoulder Seams
Use grafting stitch (Kitchener stitch) for invisible, professional-looking shoulder seams.
Armhole Edges
- Using 3mm short circular needle, pick up 88-132 stitches evenly around armhole
- Adjust count to be divisible by 4
- Work K2P2 rib in the round for 2cm
- Bind off in pattern
Right Front Band and Neck Edge
- Pick up 144-172 stitches along right front and half of back neck
- Purl 1 WS row, increasing 4 stitches at V-neck point with yarn overs
- Work 2 garter edge stitches, K2P2 rib to end
- At 1cm, work 6 buttonholes as instructed
- At 2.5cm, bind off in pattern
Left Front Band and Neck Edge
- Pick up same number of stitches as right band
- Work as right band but omit buttonholes
- Place 2 garter edge stitches at end instead of beginning
- Bind off at 2.5cm
Final Assembly
Sew 6 buttons onto left band, aligned with buttonholes.
Customization Ideas for Your Vest
Color and Yarn Variations
Seasonal Adaptations:
- Spring/Summer: Use cotton or linen blends in pastels or bright colors
- Fall/Winter: Choose heavier wool in earth tones, burgundy, or navy
- Year-Round: Merino wool in classic neutrals (gray, cream, camel, black)
Texture Play:
- Substitute tweeds for rustic, country style
- Use hand-dyed yarns for subtle color variation
- Try heathered yarns for dimension
Design Modifications
Length Adjustments:
- Shorten for a cropped, modern look
- Lengthen for a tunic-style vest
- Add length before ribbing, not during body shaping
Pocket Addition: Add patch pockets or welt pockets to the front pieces before joining the body.
Neckline Variations:
- Adjust V-neck depth by changing when increases begin
- Create a deeper V by increasing more frequently
- Add a collar by picking up additional stitches around neckline
Embellishment Options
- Use decorative buttons as a statement feature
- Add duplicate stitch embroidery after completion
- Create a Fair Isle or stranded colorwork yoke
- Attach a knitted or crocheted flower brooch
Care Instructions for Your Finished Vest
Washing Your Knitted Vest
Hand Washing (Recommended):
- Fill basin with cool water and wool-safe detergent
- Gently submerge vest, avoid agitation
- Soak for 10-15 minutes
- Rinse thoroughly in cool water
- Press out excess water (don’t wring)
Machine Washing: If yarn is machine-washable, use delicate cycle, cold water, and mesh bag.
Drying and Storage
- Lay flat on towel, reshape to measurements
- Dry away from direct heat and sunlight
- Store folded (not hanging) to maintain shape
- Use cedar or lavender sachets to deter moths
Common Knitting Questions and Troubleshooting
Q: Can beginners knit this vest pattern?
A: While manageable for ambitious beginners, this pattern is best suited for intermediate knitters comfortable with shaping, picking up stitches, and following multi-step instructions.
Q: How long does it take to knit a vest?
A: Expect 20-40 hours depending on your size, speed, and experience level. Smaller sizes work up faster than larger sizes.
Q: Can I knit this vest in the round?
A: This pattern is designed to be worked flat. Converting to circular construction would require significant pattern modifications.
Q: What if my gauge is slightly off?
A: Even one stitch per 10cm difference can affect the final size significantly. Always adjust needles to match gauge exactly.
Q: Can I use a different yarn weight?
A: You’d need to recalculate the entire pattern for different gauge. Stick with DK/light worsted weight yarns for best results.
Q: How do I substitute yarn brands?
A: Choose any yarn with similar meterage per 50g, fiber content, and gauge specifications. Always swatch your substitute yarn.
to find more clothing patterns click here