How to Knit Adorable Felted Mice: Complete Beginner-Friendly Pattern Guide
Introduction to Felted Mouse Knitting
Learn how to create charming felted mouse toys with this comprehensive knitting pattern. These adorable mice make perfect handmade gifts, nursery decorations, or collectible toys. After felting, each mouse measures approximately 5⅛ inches (13 cm) and features sweet details like embroidered eyes and a crocheted tail.
What is Felting in Knitting?
Felting (or fulling) is a process where wool fabric shrinks and becomes denser when agitated in hot water. This creates a soft, fuzzy texture that’s perfect for toys. These mice are knitted larger than desired, then felted in the washing machine to achieve their final size.
Materials Needed for Felted Mice
Yarn Requirements
This pattern uses DROPS Snow yarn (yarn group E, bulky weight):
- Light Grey Mouse: 50g color 53 (light grey) + 50g color 30 (pastel pink for nose)
- Dark Grey Mouse: 50g color 46 (medium grey) + 50g color 83 (mauve for nose)
- Both Mice Need: 50g color 02 (black for tail and eyes)
Each completed mouse weighs approximately 36-40 grams when stuffed.
Tools and Supplies
- Knitting Needles: Size 8mm (US 11)
- Crochet Hook: Size 7mm (US 10.75)
- Stuffing: Polyester wadding or fiberfill
- Tapestry Needle: For sewing seams and embroidering eyes
Knitting Gauge and Needle Size
Gauge: 11 stitches × 15 rows = 4″ × 4″ (10cm × 10cm) in stockinette stitch
Important Gauge Note: If you’re getting too many stitches per 4 inches, switch to larger needles. If you’re getting too few stitches, switch to smaller needles. Proper gauge ensures your mouse will felt to the correct size.
Dimensions Before and After Felting
- Before Felting: Approximately 6¼ inches (16 cm)
- After Felting: Approximately 5⅛ inches (13 cm)
The felting process shrinks the mouse by about 20%, creating a dense, durable fabric.
Step-by-Step Knitting Instructions
Part 1: Knitting the Mouse Body
Cast On: Using size 8mm needles and your chosen grey color, cast on 16 stitches.
Rows 1-2: Work in stockinette stitch (knit on right side, purl on wrong side).
Row 3 (Increase Row): Increase 8 stitches evenly by knitting 2 stitches into every other stitch across the row. You’ll now have 24 stitches.
Continue: Work stockinette stitch until your piece measures 5½ inches (14 cm) from cast-on edge.
Decrease Row: Knit 2 together across the entire row, reducing to 12 stitches.
Work 2 More Rows: Continue in stockinette stitch.
Nose Row: Switch to pastel pink or mauve yarn and knit one row.
Finish: Cut yarn leaving a long tail. Thread through remaining stitches and pull tight.
Part 2: Knitting the Ears (Make 2)
Cast On: 5 stitches in grey yarn.
Rows 1-4: Knit all rows (garter stitch).
Row 5: K2tog, K1, K2tog (3 stitches remain).
Rows 6-7: Knit 2 rows.
Row 8: K3tog. Cut yarn and pull through last stitch.
Repeat for second ear.
Part 3: Crocheting the Tail
Using black yarn and 7mm crochet hook:
- Chain 12 stitches
- Starting in 2nd chain from hook, work 3 double crochets in each chain stitch
- Cut yarn and weave in end
This creates a curly, textured tail.
Assembly Instructions
Sewing the Body
- Fold the body piece lengthwise with right sides together
- Sew the side seam using the outermost loops of edge stitches for an invisible seam
- Leave the cast-on end open for stuffing
- Turn right side out
Stuffing the Mouse
- Fill with polyester wadding or fiberfill
- Important: Don’t overstuff! The mouse needs room to shrink during felting
- Fill to about 70-80% capacity for best felting results
- Close the opening with mattress stitch
Attaching Ears and Features
- Position ears on top of head, slightly to the sides
- Sew ears securely using matching yarn
- Embroider eyes using black yarn: create 2 small stitches for each eye
- Attach tail at the back seam, sewing securely
The Felting Process: Machine Washing Method
Washing Machine Settings
- Temperature: 40°C (104°F)
- Cycle: Normal wash with regular spin
- No Pre-Wash: Turn off pre-wash cycle
- Detergent: Use enzyme-free and bleach-free detergent
Important Felting Tips
- Add a towel: Place mice in a pillowcase or laundry bag with a towel for agitation
- Don’t overload: The mice need room to move and agitate
- Watch the first time: Check on your mice during the first felting to gauge shrinkage
Shaping After Felting
While still wet, shape your mice:
- Smooth out any wrinkles
- Define the nose area
- Position ears at desired angle
- Gently reshape the body to desired form
Let dry completely at room temperature (24-48 hours).
Troubleshooting Felting Problems
Mouse Too Large (Under-Felted)
Solution: While still wet, wash again immediately with a terry towel (approximately 20″ × 27½”). Don’t use a short cycle.
Mouse Too Small (Over-Felted)
Solution: While wet, gently stretch to correct size. If already dry, soak in lukewarm water first, then stretch and reshape.
Uneven Felting
Cause: Inconsistent tension in knitting or uneven agitation Prevention: Maintain consistent tension while knitting; ensure mice have room to move in washer
Care Instructions for Felted Mice
After the initial felting, care for your mice as regular wool garments:
- Hand wash in cool water with wool-safe detergent
- Avoid hot water to prevent further shrinking
- Air dry flat
- No machine drying
Color Combinations and Variations
Classic Combinations
- Light grey body with pastel pink nose
- Medium grey body with mauve nose
- Black tail and eyes on all mice
Creative Alternatives
- White body with pink nose for a pet mouse look
- Brown tones for a field mouse
- Multiple colors for a family of mice
Tips for Success
- Use 100% wool: Superwash wool won’t felt properly
- Check your yarn: Ensure your yarn is feltable before starting
- Make a test swatch: Felt a small swatch first to check shrinkage rate
- Don’t rush stuffing: Proper stuffing density is key to good felting
- Shape while wet: This is your only chance to perfect the shape
Skill Level and Time Requirements
Skill Level: Beginner to Intermediate
Time Required:
- Knitting: 3-4 hours per mouse
- Assembly: 30 minutes
- Felting and drying: 24-48 hours
Project Ideas and Uses
These felted mice are perfect for:
- Baby gifts and nursery decorations
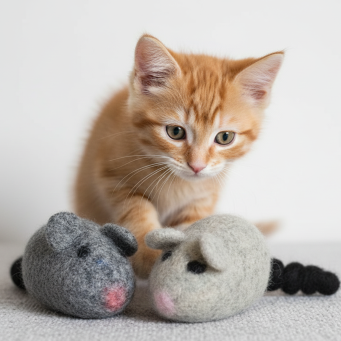
- Cat toys (supervise play with stuffed toys)
- Holiday ornaments (add a hanging loop)
- Collectible toys for mouse enthusiasts
- Teaching children about knitting and felting
- Market items for craft fairs
Frequently Asked Questions
Can I use different yarn weights? You can, but adjust needle size and expect different finished dimensions. Bulky weight is ideal for quick felting.
Do I need to use the exact yarn brand? No, any feltable bulky weight 100% wool will work. Avoid superwash wool.
Can I skip the felting step? You could, but the mouse will be larger and less durable. Felting creates the signature dense texture.
How do I know if my yarn will felt? Check the label – avoid “superwash” or “machine washable” wool. When in doubt, test a swatch.
Can children help with this project? Absolutely! Older children can knit under supervision, and younger ones can help stuff and decorate.
To find more plushies patterns click here