Knitted Sweater and Hat Set Pattern (5–6 Years)
Preview / Short description
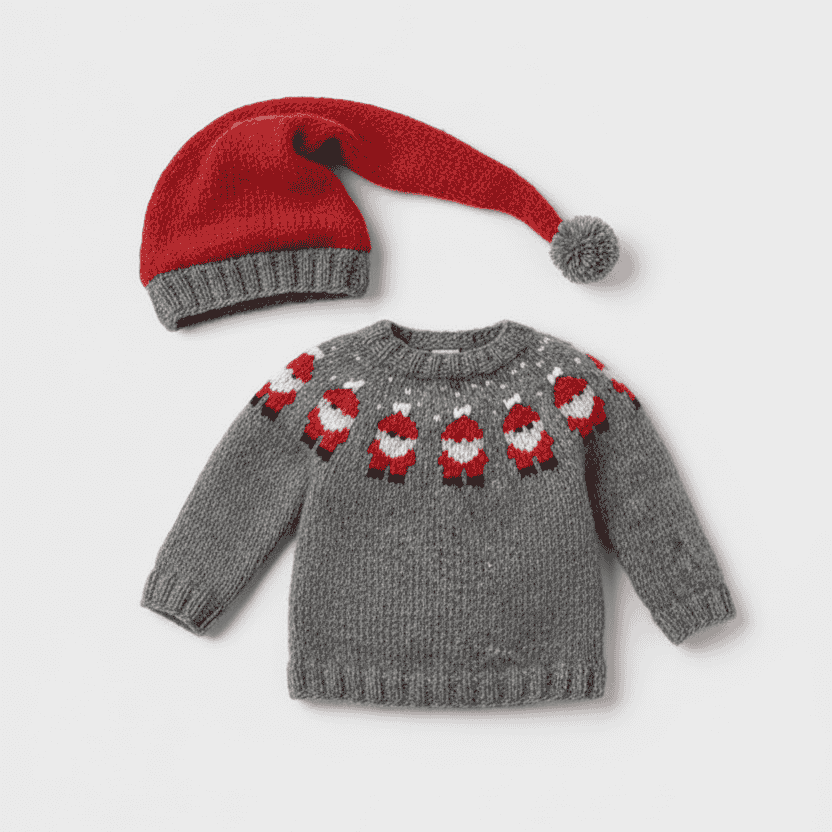
A top-down, circular yoke sweater for children (size 5/6 years) with a colorwork yoke motif and a matching pom-pom hat. Worked in a lightweight airy yarn (yarn group C) with clear step-by-step instructions so your finished sweater measures Chest 76 cm (29½”) and Full length 44 cm (17¼”).
Sizes & finished measurements
Size: 5/6 years
Children’s height (cm): 92 – 98/104 – 110/116 – 122/128 – 134/140 – 146/152 – 158/164
Head size: 52/53 cm = 20½”/21” (hat)
Finished measurements: Chest 76 cm = 29½”; Full length 44 cm = 17¼”
(All measurements in charts are in cm.)
Materials
Yarn — lightweight airy yarn (yarn group C):
- 150 g medium grey
- 50 g off white
- 50 g wheat
- 50 g raspberry
- 50 g black
Hat yarn (extra):
- 50 g color 25 — raspberry
- 50 g color 04 — medium grey
Needles:
- Circular needle size 5 mm (US 8) — lengths 40 cm (16″) and 60 cm (24″)
- Circular needle size 4 mm (US 6) — lengths 40 cm (16″) and 60 cm (24″)
- Double pointed needles (DPNs) 5 mm (US 8) and 4 mm (US 6)
- (Or use magic-loop with an 80 cm / 32″ circular needle in each size.)
Notions: waste thread for holding sleeve stitches, stitch markers, tapestry needle, small scissors.
Gauge / Tension
- Sweater: 17 sts × 22 rows in stockinette = 10 × 10 cm (4″ × 4″)
- Hat: 18 sts × 23 rows in stockinette = 10 × 10 cm (4″ × 4″)
Note: Needle sizes are a guideline. If you have more stitches per 10 cm, go up a needle size; if fewer, go down a size.
Symbols / Colour legend (for diagrams)
- medium grey = main color
- off white
- raspberry
- wheat
- black
- the symbol “between 2 stitches make 1 yarn over” — on next round work the yarn over twisted to avoid a hole
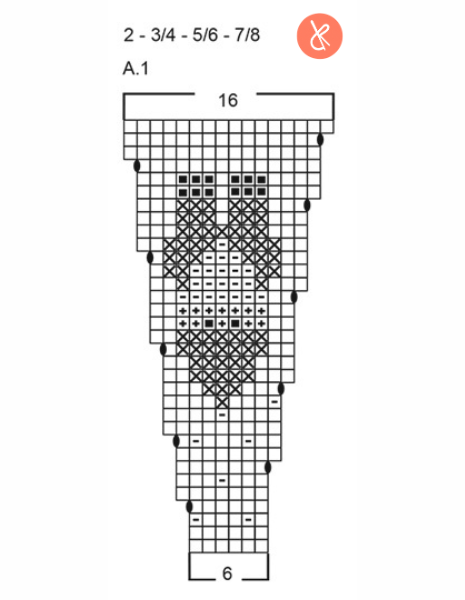
(Refer to diagram A.1 for the colorwork motif—choose the chart variant that matches your size.)
Pattern — important tips (before you start)
- Increase/Decrease evenly spaced: Count total sts (e.g., 60) ÷ number of increases (e.g., 6) = spacing (10). Make a yarn-over after each 10th stitch for increases; on the following round work the YO twisted to avoid holes. For decreases, work k2tog where spacing dictates (eg. knit together each 9th and 10th stitch when following the above example).
- Avoid tight floats: When working color pattern, do not pull strands too tight across the WS — if pattern pulls the fabric in, switch to the next needle size.
- Sleeve decrease (underarm): Work until 3 sts before marker, k2tog, k2 (marker sits between these 2), slip 1 as if to knit, k1, pass slipped stitch over.
- Hat decrease (top): Work until 2 sts before marker, k2tog (repeat at each marker).
- Bind off tip: If bind-off is tight, use a larger needle. If still tight, make a YO approx. every 4th stitch while binding off; the YOs are bound off as normal stitches.
Sweater — Step-by-step (top-down, circular yoke)
Neck / rib
- Cast on 64 sts with DPNs / short circular 4 mm and medium grey. Join for working in the round.
- Knit 1 round, then work rib k2, p2 for 3 cm (1⅛”).
- Change to 5 mm circular needle.
Yoke — increase & color pattern
- Place a marker at the beginning of the round (this mark is your yoke reference point). Knit 1 round while increasing 14 sts evenly = 78 sts. (See Increase/Decrease evenly spaced.)
- Work colorwork following diagram A.1 — pattern is worked in stockinette. A.1 = 13 repeats of 6 sts (choose the diagram for your size). Follow knitting tip about floats.
- When A.1 has reached charted height you should have 208 sts. Knit 1 round in medium grey and decrease 12 sts evenly = 196 sts.
- Continue in stockinette (medium grey) until yoke measures 16 cm (6¼”) from the marker.
Divide for body & sleeves
- Divide as follows (keeping continuity of stitch order):
- Knit 29 (half back), place next 40 sts on a thread (sleeve 1), cast on 6 sts for under-arm, knit 58 (front), place next 40 sts on a thread (sleeve 2), cast on 6 sts for under-arm, knit last 29 (half back).
Now the body and sleeves are worked separately. This point is your new measurement start.
Body (in-the-round)
- You now have 128 sts on the needle. Work stockinette in the round with medium grey for 23 cm (9″) (or to desired length; approx. 3 cm (1⅛”) remain to finished length).
- Change to 4 mm circular needle. Work k2, p2 rib for 3 cm (1⅛”).
- Bind off loosely using knit over knit / purl over purl — follow Binding-off tip. Cut yarn and fasten off. The sweater length from shoulder ≈ 44 cm (17¼”).
Sleeves (worked top-down)
- Place the 40 sts from waste thread onto DPNs / short circular 5 mm and pick up 1 stitch in each of the 6 cast-on underarm sts = 46 sts.
- Insert a marker in the middle of the 6 picked-up underarm sts; leave the marker thread to follow and be used for decreases.
- From this marker, work stockinette in the round with medium grey for 3 cm (1⅛”).
- Decrease 2 sts under the sleeve using the DECREASE TIP-2. Repeat this decrease every 6 cm (2⅜”) a total of 4 times → 38 sts remain.
- Continue until sleeve measures 24 cm (9½”) from the division point. There is approximately 3 cm (1⅛”) left to finished length — try on and adjust as desired.
- Knit 1 round increasing 6 sts evenly = 44 sts. Change to 4 mm DPNs and work k2, p2 rib for 3 cm (1⅛”).
- Bind off loosely as instructed. Final sleeve length ≈ 27 cm (10⅝”). Repeat for second sleeve.
Decorative knot detail (Santa hat / small tassel)
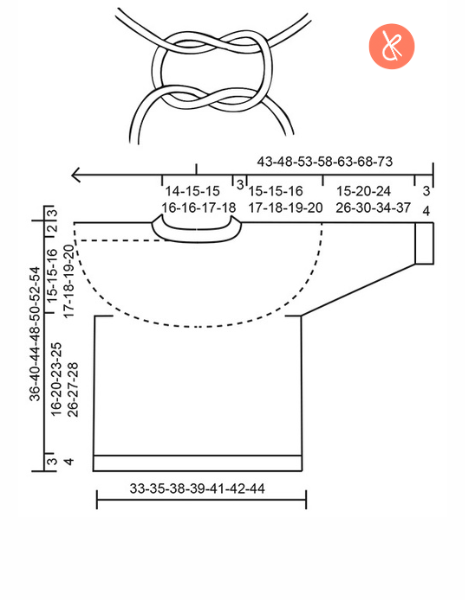
- At the top of each small Santa hat decorating detail: cut two 10 cm (4″) strands in off-white, fold together, thread through the top off-white stitch so both ends are on the right side. Tie a knot, then a second knot in the opposite direction (see sketch), trim leaving ½ cm (1/8″) ends. Repeat for each hat top detail.
Hat — Step-by-step (bottom-up, circular)
Brim
- Cast on 100 sts with circular 3.5 mm (US 4) in medium grey. Join and purl 1 round.
- Work k2, p2 rib in the round for 5 cm (2″).
Crown shaping & color
- Switch to 4.5 mm and knit 1 round while decreasing 12 sts evenly — see Increase/Decrease tip. (This produces 84–88–92–96–100 sts depending on variation in chart.)
- Change to raspberry and work stockinette. Remember gauge.
- When piece measures 19 cm (7½”) from cast-on, decrease 0–4–2–0–4 sts evenly spaced → result 84 sts.
- Place 6 markers around the crown with 14 sts between each marker. On the next round, decrease 1 stitch before each marker (i.e., k2tog before marker) = 6 sts decreased. Repeat that decrease every 2nd round a total of 2 times.
- Then decrease every 7th round 10 times (total 12 sts decreased from this sequence).
- Work until hat measures 52 cm (20½”), then k2tog across, knitting together 2 & 2 = 6 sts remaining. Cut yarn and pull through remaining sts; tighten and secure.
Pom-pom
- Make a medium grey pom-pom approx. 5 cm (2″) in diameter and sew it firmly to the top of the hat.
Diagram references & images
- Use diagram A.1 for the colorwork yoke: choose chart variant to match your size (diagram shows a 16-st wide repeat and the tapering).
- If posting this pattern to a blog post, include the two images (yoke schematic + A.1 chart).
Suggested image alt texts:
- “Top-down children’s yoke sweater schematic with measurements in cm.”
- “Chart A.1 triangular colorwork motif for Santa yoke — 16 sts repeat.”

FAQs (SEO-friendly)
Q: What yarn is recommended?
A: Use a lightweight airy yarn (yarn group C). Quantities listed: 150 g medium grey, plus 50 g each of off white, wheat, raspberry and black.
Q: Can I use the magic-loop method?
A: Yes — replace each circular needle size with an 80 cm (32″) circular and use magic loop for all in-the-round sections.
Q: How do I choose needle size if my gauge is off?
A: If you have more than 17 sts / 10 cm for the sweater, use a larger needle; if fewer, use a smaller needle. Same rule applies for the hat with its gauge of 18 sts / 10 cm.
Q: Do I need to block the sweater?
A: Light blocking after finishing will even stitches and open the colorwork. Follow your yarn’s care guidelines.
to find more clothing patterns click here