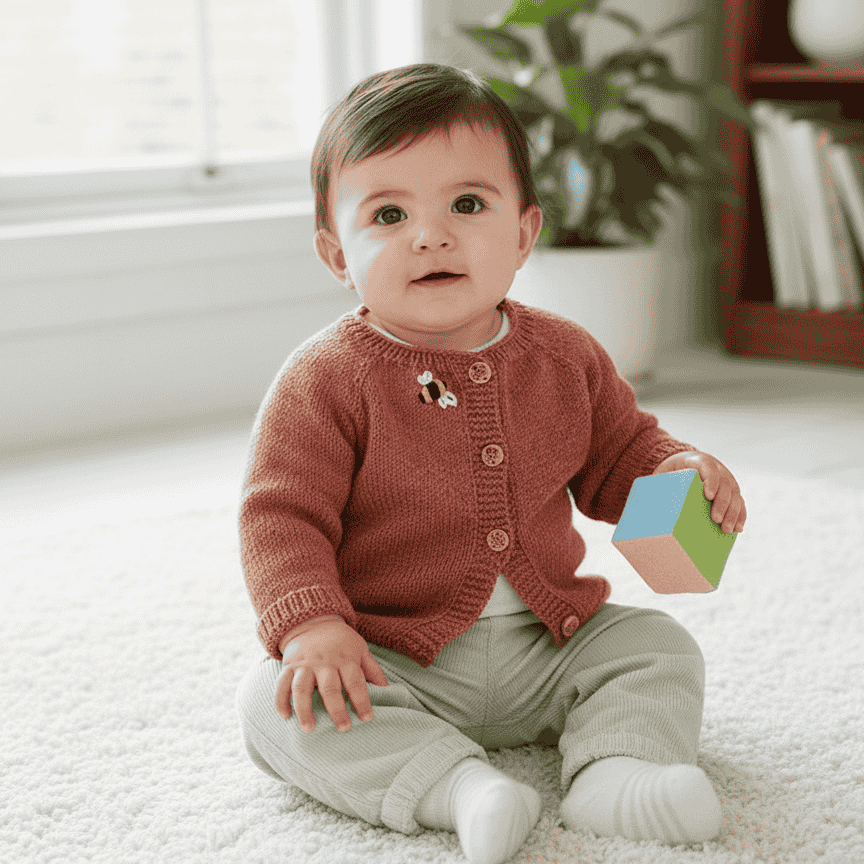
How to Knit a Baby Jacket with Bee Embroidery: Step-by-Step Guide
This adorable baby cardigan features a sweet embroidered bee and is knitted from the top down in one piece. This detailed guide breaks down every step to make the pattern easy to follow.
Pattern Overview
Skill Level: Intermediate
Construction: Top-down raglan, worked flat with button bands
Special Features: Embroidered bee motif, seamless sleeves
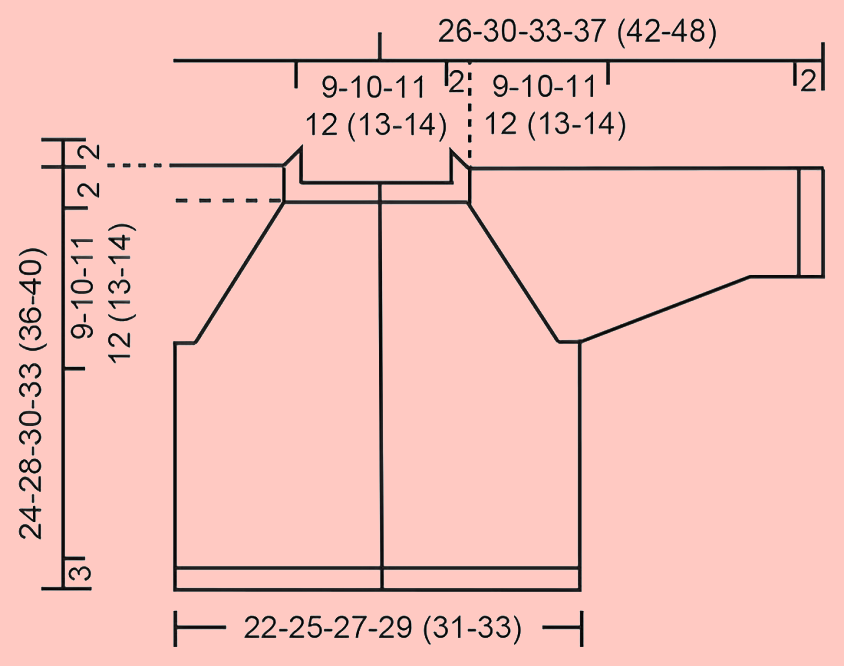
Sizes and Measurements
| Size | Height | Chest | Length |
|---|---|---|---|
| 0/1 months | 48-52 cm (19-20″) | 44 cm (17¼”) | 24 cm (9½”) |
| 1/3 months | 56-62 cm (22-24″) | 50 cm (19¾”) | 28 cm (11″) |
| 6/9 months | 68-74 cm (27-29″) | 54 cm (21¼”) | 30 cm (11¾”) |
| 12/18 months | 80-86 cm (31-34″) | 58 cm (22¾”) | 33 cm (13″) |
| 2 years | 92 cm (36″) | 62 cm (24⅜”) | 36 cm (14¼”) |
| 3/4 years | 98-104 cm (39-41″) | 66 cm (26″) | 40 cm (15¾”) |
Materials You’ll Need
Yarn
- 100-150g Baby Merino (blush color) – main yarn
- Small amounts for bee: black, mustard, and off-white yarn
Needles
- 3mm (US 2.5) circular needle, 80cm long
- 2.5mm (US 1.5) circular needle, 80cm long
- Double-pointed needles in both sizes (or use magic loop)
Other Supplies
- 5-6 buttons
- 4 stitch markers
- Tapestry needle
- Waste yarn or stitch holders
Gauge
24 stitches × 32 rows = 10 cm (4″) square in stockinette stitch on 3mm needles
This is crucial! If your gauge is off, your jacket won’t fit properly.
Step-by-Step Instructions
STEP 1: Cast On and Neckband
What you’re doing: Creating the neck edge and ribbed collar
- Using 2.5mm needle, cast on:
- 75 (81, 85, 91, 95, 99) stitches
- Row 1 (wrong side): Purl across, but keep the first and last 6 stitches in garter stitch (knit every row)
- Start ribbing pattern:
- Knit 6 (button band)
- Knit 1, purl 1 repeat across middle stitches
- Knit 1
- Knit 6 (button band)
- Continue ribbing for 2 cm (¾”)
- Switch to 3mm needle
- Place a marker after the first 6 stitches – this marks where you’ll measure the yoke length
STEP 2: Set Up the Yoke
What you’re doing: Increasing stitches and placing markers for raglan shaping
Increase Row (right side):
- Knit 6 (button band)
- Knit across middle stitches, increasing evenly:
- Add 9 (11, 7, 13, 13, 17) stitches spread out across this section
- New total: 84 (92, 92, 104, 108, 116) stitches
- Knit 6 (button band)
How to increase evenly: Divide the middle stitches by the number of increases needed. Work that many stitches, then make 1 stitch (M1), repeat across.
First Buttonhole: When 3 stitches remain, yarn over, knit 2 together, knit 1
Next Row (wrong side) – Place Your 4 Markers:
- Knit 6 (band), purl 11 (13, 13, 16, 17, 19)
- MARKER 1 in next stitch (right front raglan line)
- Purl 12
- MARKER 2 in next stitch (right sleeve raglan line)
- Purl 22 (26, 26, 32, 34, 38)
- MARKER 3 in next stitch (left sleeve raglan line)
- Purl 12
- MARKER 4 in next stitch (left front raglan line)
- Purl 11 (13, 13, 16, 17, 19), knit 6 (band)
STEP 3: Raglan Increases
What you’re doing: Increasing at 4 points to shape the yoke
Every right-side row:
- Knit to marker
- Yarn over
- Knit the marked stitch
- Yarn over
- Continue to next marker and repeat
Do this at all 4 markers = 8 stitches increased per row
On wrong-side rows: Purl the yarn overs through the back loop (twisted) to prevent holes
Number of increase rows: 12 (14, 16, 17, 18, 19) times
Total stitches after increases: 180 (204, 220, 240, 252, 268)
Continue until yoke measures: 9 (10, 11, 12, 13, 14) cm from marker
STEP 4: Buttonhole Placement
Place buttonholes evenly down the right front band:
- 1st buttonhole: At 2 cm from neck
- Remaining 4-5 buttonholes: Every 5-7 cm (2-2¾”) depending on size
Spacing: 5 (6, 6½, 7, 6½, 7) cm between buttonholes
How to work buttonhole: Yarn over, knit 2 together, knit 1 (last 3 stitches of right-side row)
STEP 5: Divide for Body and Sleeves
What you’re doing: Separating sleeves from body
Division Row (right side):
- Knit 6 (band)
- Knit 23 (27, 29, 32, 34, 37) – right front
- Place next 38 (42, 46, 50, 52, 54) stitches on holder – right sleeve
- Cast on 6 new stitches for underarm
- Knit 46 (54, 58, 64, 68, 74) – back
- Place next 38 (42, 46, 50, 52, 54) stitches on holder – left sleeve
- Cast on 6 new stitches for underarm
- Knit 23 (27, 29, 32, 34, 37) – left front
- Knit 6 (band)
Body stitches: 116 (132, 140, 152, 160, 172)
STEP 6: Work the Body
What you’re doing: Working straight down to the hem
- Continue in stockinette stitch with 6 garter stitch button bands on each side
- Work until body measures from division:
- 10 (13, 14, 16, 18, 21) cm
- Increase row (right side):
- Add 13 (13, 15, 15, 17, 19) stitches evenly across (not in bands)
- Total: 129 (145, 155, 167, 177, 191) stitches
- Switch to 2.5mm needle
- Work ribbing for 3 cm:
- Knit 6 (band)
- Purl 1, knit 1 across middle
- Purl 1
- Knit 6 (band)
- Bind off all stitches
STEP 7: Knit the Sleeves
What you’re doing: Working each sleeve in the round from armhole down
For each sleeve:
- Place 38 (42, 46, 50, 52, 54) held stitches on 3mm double-pointed needles
- Pick up 6 stitches from the underarm cast-on
- Total: 44 (48, 52, 56, 58, 60) stitches
- Place marker in the middle of the 6 picked-up stitches (center underarm)
- Knit in the round in stockinette stitch
- Start decreasing after 1 cm:
- Work to 3 stitches before marker
- K2tog, K2 (marker between)
- SSK (slip 1, slip 1, knit together)
- Decrease every:
- 2½ (2½, 1½, 2, 2, 3) cm
- Total times: 3 (4, 6, 7, 7, 7)
- Remaining: 38 (40, 40, 42, 44, 46) stitches
- When sleeve measures 8 (11, 12, 15, 18, 23) cm:
- Increase 4 (4, 4, 4, 6, 6) stitches evenly
- Total: 42 (44, 44, 46, 50, 52) stitches
- Switch to 2.5mm needles
- Work rib (K1, P1) for 2 cm
- Bind off
- Repeat for second sleeve
Embroidering the Bee
Positioning
- 3 cm below neckline
- 4 cm from button band
- On the right front piece
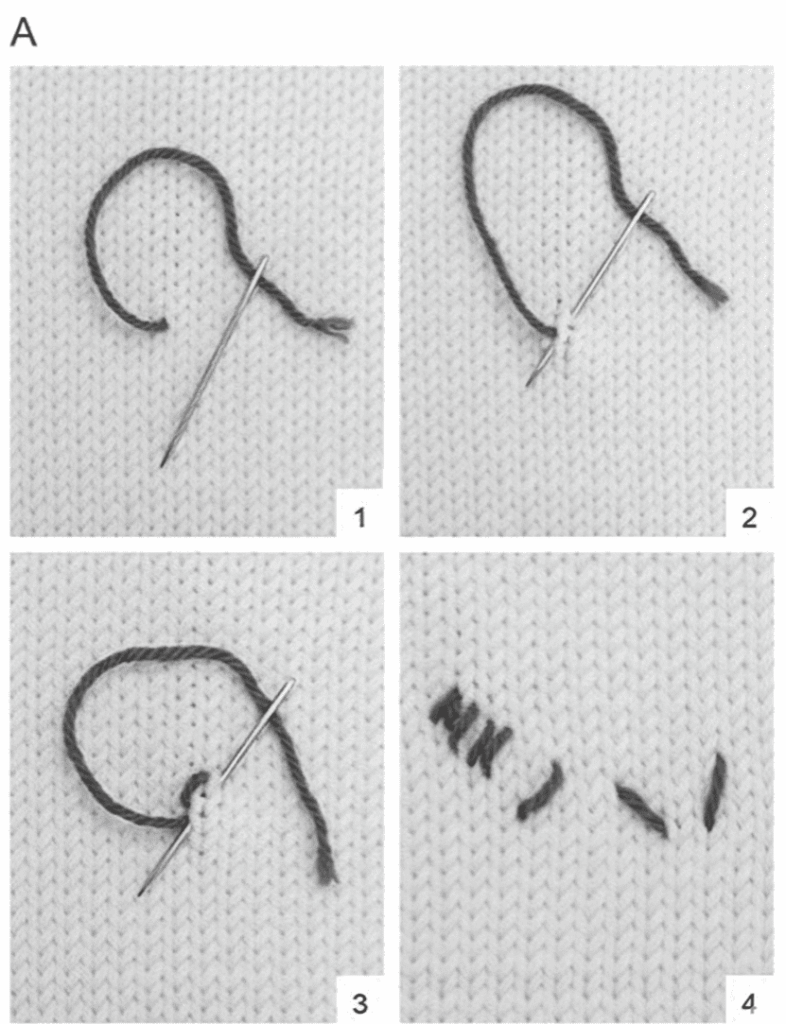
Bee Body (Black and Mustard Stripes)
Use single strand and flat stitch (like satin stitch)
Black stripe 1 (tail):
- 2 flat stitches close together
- 0.5 cm (⅛”) long
- Diagonal, slanting up toward button band
Skip 0.5 cm diagonally
Black stripe 2 (middle):
- 4 flat stitches close together
- 1 cm (⅜”) long
- Parallel to first stripe
Skip 0.5 cm diagonally
Black stripe 3 (head):
- 2 flat stitches close together
- 0.5 cm (⅛”) long
- Parallel to other stripes
Mustard stripes:
- Fill the gaps between black stripes
- 4 flat stitches in each gap
- Same length as adjacent black stitches
- Creates 2 yellow stripes
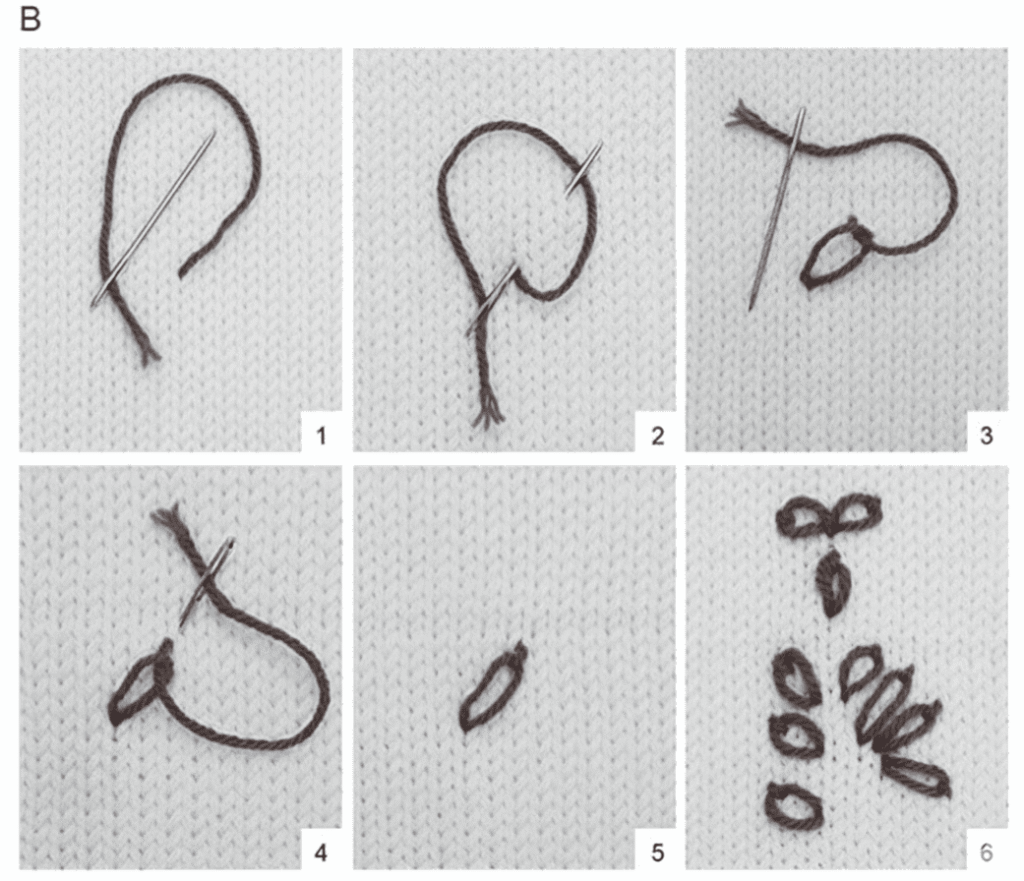
Bee Wings (Off-White Chain Stitch)
Each wing is one chain stitch, 1-1.5 cm long
Right side wings:
- Both start from the same point on the bee’s middle
- One chain stitch angling up and back
- One chain stitch angling up and forward
Left side wings:
- Repeat the same on the opposite side
- Total of 4 wings (2 pairs)
How to work chain stitch:
- Bring needle up where wing starts
- Insert needle back in same hole
- Bring tip up 1 cm away, keeping yarn under needle
- Pull through to form loop
- Secure end with a tiny stitch
Final Assembly
- Sew buttons onto left front band, aligned with buttonholes
- Weave in all yarn ends securely
- Block gently by laying flat, pinning to measurements, and misting with water
- Allow to dry completely
Troubleshooting Tips
Problem: Gauge is too tight (too many stitches per 10cm)
Solution: Use larger needles
Problem: Gauge is too loose (too few stitches per 10cm)
Solution: Use smaller needles
Problem: Holes at raglan increases
Solution: Make sure to purl yarn overs twisted on wrong-side rows
Problem: Buttonholes too large
Solution: Use a smaller yarn over or reinforce with stitching
Problem: Sleeves too tight
Solution: Cast on 8 stitches at underarm instead of 6
to find more clothing patterns click here