How to Knit Christmas Mittens: Nordic Pattern Guide for Festive Holiday Knitting
Creating handmade Christmas mittens with traditional Nordic patterns is a wonderful way to celebrate the holiday season while crafting functional, beautiful accessories. This comprehensive guide will walk you through knitting stunning Christmas-themed mittens using the classic Karisma yarn and authentic Scandinavian design techniques.
Why Knit Christmas Mittens with Nordic Patterns?
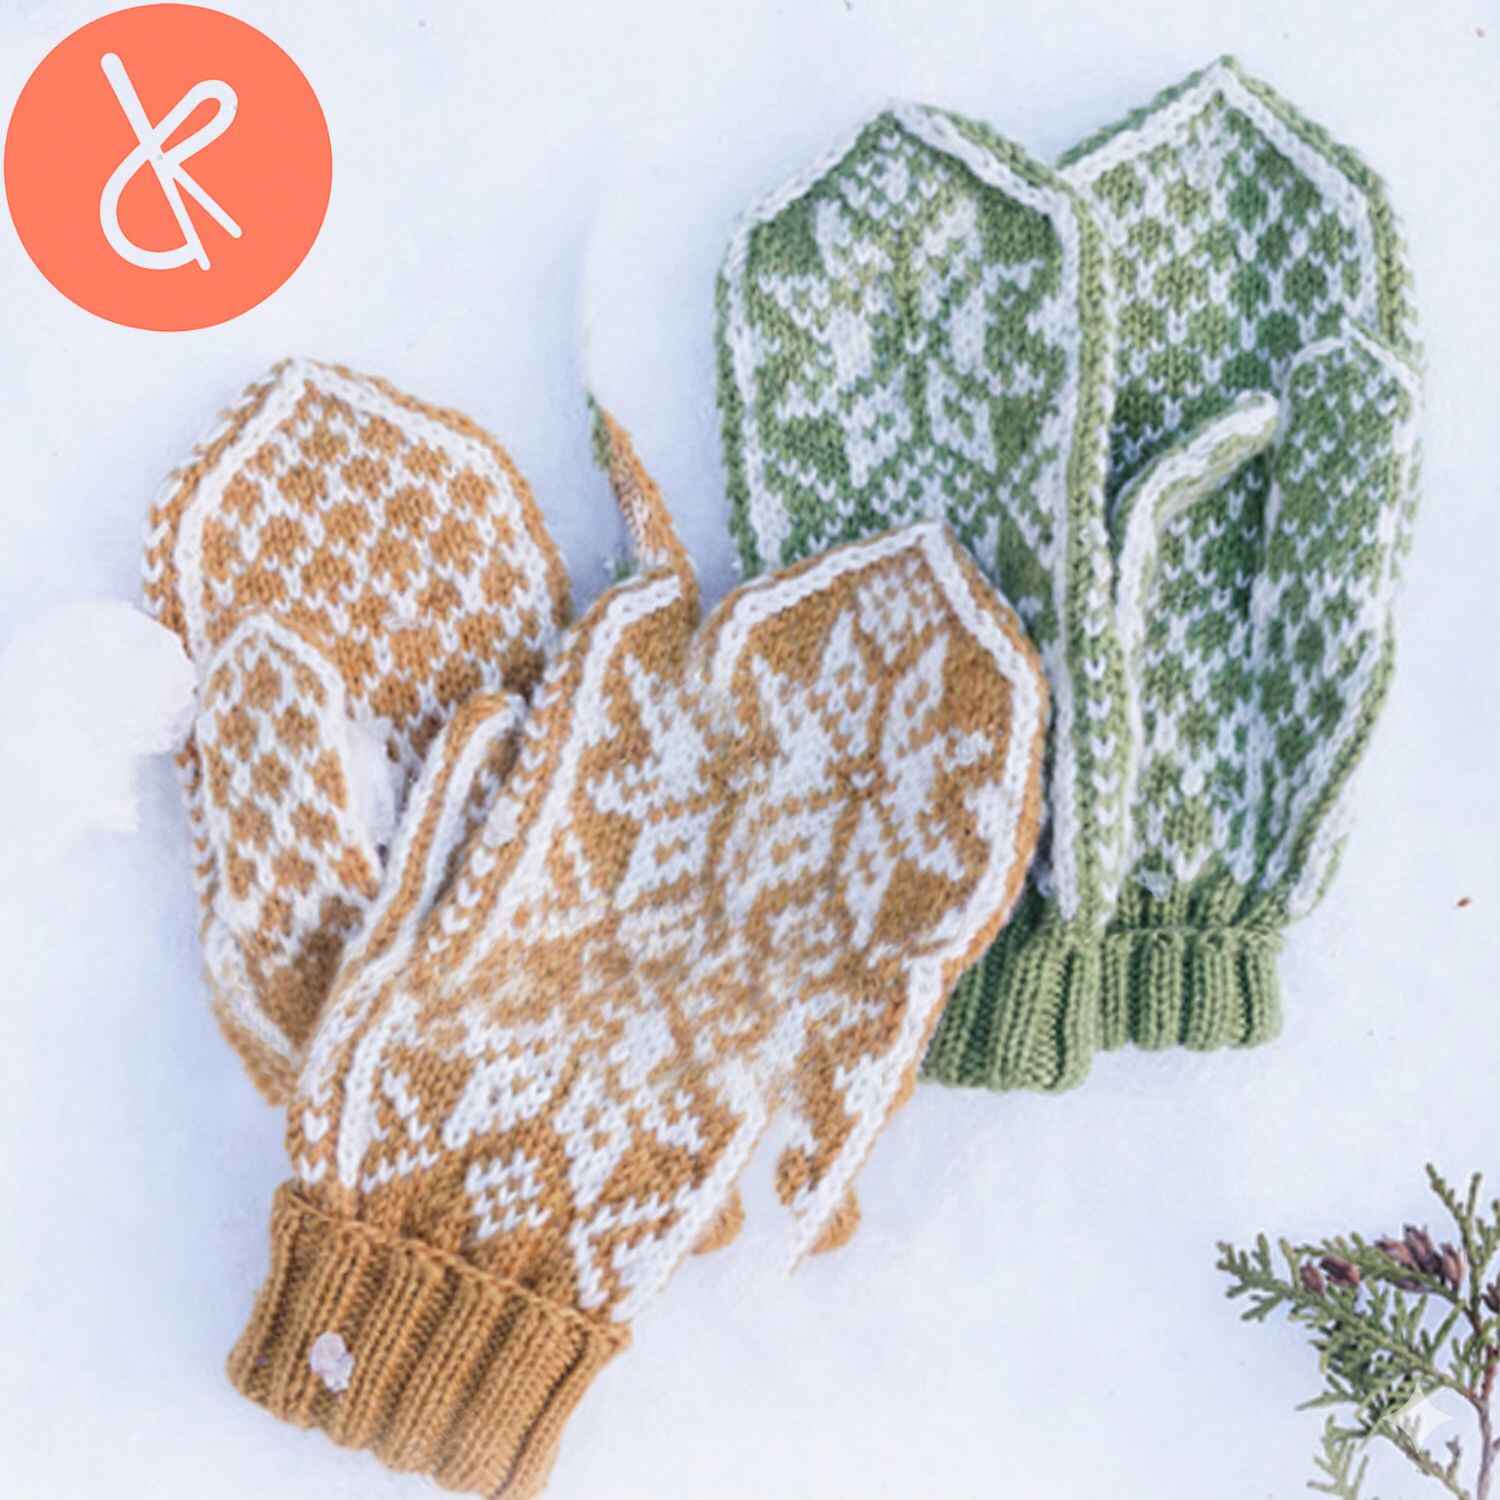
Nordic knitting patterns have captivated crafters for generations with their geometric beauty and cultural significance. When you knit Christmas mittens featuring these timeless designs, you’re creating more than just winter accessories—you’re crafting wearable art that combines warmth, style, and tradition. The contrasting colors and symmetrical patterns make these mittens perfect for holiday gift-giving or adding festive flair to your winter wardrobe.
Essential Materials for Your Christmas Mittens Project
Yarn Selection
For authentic Christmas mittens, Karisma yarn (yarn group B) provides the ideal combination of warmth, durability, and stitch definition. You’ll need:
- 50g off white (color 01) – for the pattern details
- 100g red (color 18) – as your background color
Alternative color combinations include petrol (73), light beige brown (55), dark mustard (52), or light olive (45) for a unique twist on traditional Christmas colors. Learn more about choosing the right yarn for your projects.
Required Tools
- Double pointed needles size 3mm (US 2.5)
- Stitch markers
- Yarn needle for finishing
- Thread or stitch holder for thumb stitches
Remember, needle size serves as a guide. Always check your knitting gauge to ensure proper fit.
Understanding Your Knitting Gauge
Achieving the correct gauge is crucial for well-fitting Christmas mittens. Your target gauge should be:
- 23 stitches in width = 10cm (4 inches)
- 32 rows in height = 10cm (4 inches)
- Worked in stockinette stitch
If your swatch has too many stitches per 10cm, switch to larger needles. Too few stitches? Use smaller needles. Proper gauge ensures your mittens will fit comfortably and look professionally made.
Size Guide and Measurements
This pattern includes two sizes to accommodate different hand sizes:
Size S/M:
- Circumference: approximately 21cm (8¼ inches)
- Length: approximately 24cm (9½ inches) with rib folded
Size L/XL:
- Circumference: approximately 23cm (9 inches)
- Length: approximately 24cm (9½ inches) with rib folded
For help determining your size, visit our measuring guide for knitted accessories.
Step-by-Step Pattern Instructions
Creating the Ribbed Cuff
Begin your Christmas mittens by casting on 48 stitches using double pointed needles and your background color. The ribbed cuff provides elasticity and keeps your wrists warm:
- Work in the round using knit 2, purl 2 ribbing
- Continue for 12cm (4¾ inches)
- Work one round in stockinette stitch, increasing 0-4 stitches evenly for size L/XL (48-52 total stitches)
The generous cuff length allows you to fold it over for added warmth and a polished look.
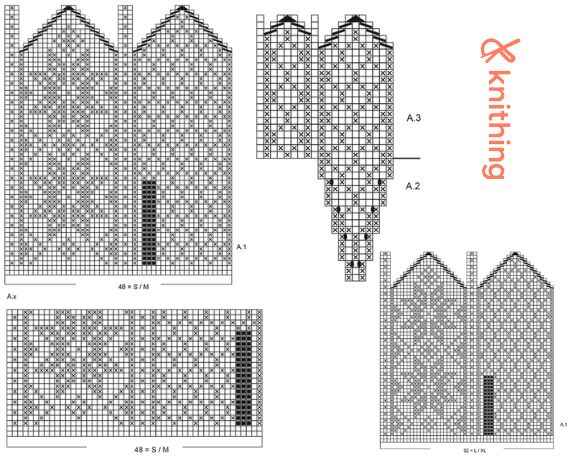
Working the Nordic Pattern
The beauty of Christmas mittens lies in their intricate colorwork patterns. The design features traditional Nordic motifs that create stunning visual interest. Following the pattern diagrams carefully ensures your motifs align correctly and your mittens look professional.
When working with two colors, maintain consistent tension to prevent puckering. Consider learning Fair Isle knitting techniques to improve your colorwork skills.
Constructing the Thumb Gusset
The thumb increases are cleverly integrated into the pattern design:
- Work according to diagram A.1 until reaching the thumb position
- Follow diagram A.2 for thumb increases (3 stitches increasing to 11)
- Place 11 thumb stitches on a holder
- Cast on 3 stitches behind the held stitches
- Continue working the hand portion
This construction method creates a comfortable, well-fitting thumb that moves naturally with your hand.
Finishing the Hand and Thumb
After completing the main hand portion according to the pattern diagrams, you’ll have 8 stitches remaining. Cut your yarn, thread it through these stitches, and secure well.
For the thumb, pick up 11 stitches from the holder plus 9 additional stitches around the thumb opening (20 total stitches). Work according to diagram A.3, decreasing to 4 final stitches. Finish as you did the hand portion.
Creating Mirror-Image Mittens
Remember that mittens are mirror images of each other. The left mitten has the thumb on one side, while the right mitten positions it on the opposite side. Diagram A.x shows the correct thumb placement for the right mitten. Pay careful attention to this detail to ensure your Christmas mittens fit properly on each hand.
Tips for Perfect Christmas Mittens
Tension and Colorwork
Maintaining even tension when working with multiple colors is essential for professional-looking mittens. Carry your unused yarn loosely across the back to prevent pulling and puckering. If you’re new to colorwork, practice on a small swatch before starting your mittens.
Weaving in Ends
With colorwork projects, you’ll have multiple yarn ends to weave in. Take time to secure these properly on the wrong side of your work, following the existing color patterns to keep them invisible from the right side.
Blocking Your Finished Mittens
After completing both mittens, gentle blocking helps even out stitches and showcase your beautiful Nordic patterns. Learn proper blocking techniques for knitted accessories to give your Christmas mittens a professional finish.
Customizing Your Christmas Mittens
While this pattern uses traditional red and white, don’t hesitate to experiment with color combinations that reflect your personal style:
- Classic Christmas: Red background with white patterns
- Winter Wonderland: Petrol blue with white
- Rustic Charm: Dark mustard with light beige
- Natural Elegance: Light olive with off-white
Each combination creates a unique look while maintaining the authentic Nordic aesthetic. Check out our color theory for knitters for more inspiration.
Beyond Basic Mittens: Expanding Your Skills
Once you’ve mastered these Christmas mittens, consider expanding your Nordic knitting repertoire. The techniques you’ve learned translate beautifully to other projects like hats, cowls, and sweaters. Our Nordic knitting pattern collection offers countless possibilities for showcasing your newfound skills.
Caring for Your Handknit Christmas Mittens
Proper care ensures your Christmas mittens remain beautiful for years to come:
- Hand wash in cool water with gentle wool wash
- Press out excess water without wringing
- Reshape while damp and lay flat to dry
- Store folded in a cool, dry place
- Add cedar sachets to prevent moths
Visit our wool care guide for detailed instructions on maintaining your handknit items.
The Joy of Handmade Holiday Gifts
Christmas mittens make exceptional handmade gifts that recipients will treasure. Unlike mass-produced accessories, handknit mittens carry the warmth of your time, skill, and thoughtfulness. Consider making multiple pairs in different sizes for family members or friends.
Starting your holiday knitting early ensures you’ll have time to create multiple pairs without stress. Many knitters begin their Christmas projects in September or October to complete everything comfortably before the holidays.
Frequently Asked Questions (FAQs)
How long does it take to knit Christmas mittens?
Most knitters can complete a pair of Christmas mittens in 15-25 hours, depending on experience level and knitting speed. The colorwork requires more concentration than plain knitting, so plan accordingly. Breaking the project into smaller sessions helps maintain consistent tension and reduces fatigue.
Can beginners knit these Christmas mittens?
While this pattern requires intermediate skills, motivated beginners can successfully complete these mittens. You should be comfortable with knitting in the round, reading charts, and basic increases. If you’re new to colorwork, consider practicing with simpler beginner mitten patterns first.
What if my gauge doesn’t match the pattern?
Gauge variations are common and easily corrected. If your gauge differs significantly, change needle sizes until you achieve the correct stitch and row count. Remember that gauge affects the final size, so accurate measurement is crucial for well-fitting mittens.
Can I use different yarn for this pattern?
You can substitute any DK or light worsted weight yarn (yarn group B), but test your gauge first. Different fiber contents may affect how the colorwork appears and how warm the mittens feel. Wool or wool blends work best for traditional Nordic patterns because they “stick” to each other, preventing color dominance issues.
How do I prevent holes at the thumb junction?
Holes at the thumb can occur when picking up stitches. To prevent this, pick up an extra stitch on each side of the thumb opening, then decrease these stitches on the next round. This technique creates a smooth, hole-free join between the thumb and hand.
What’s the best way to carry yarn in colorwork?
For Nordic patterns with relatively short color intervals, carry the unused yarn loosely across the back of your work. Float lengths should be no longer than 1 inch to prevent snagging. For longer intervals, consider using the stranding technique to catch floats.
Can I make these mittens longer or shorter?
Absolutely! Adjust the length by working more or fewer rounds before beginning the decreases. Keep in mind that changing length affects yarn requirements. Add approximately 10-15g of background color for each additional inch of length.
How do I ensure my mittens are the same size?
Count your rows carefully and use stitch markers to track your progress. Take notes as you complete the first mitten, recording exact round counts for each section. This ensures your second mitten matches perfectly.
What’s the difference between left and right mittens?
The mittens are mirror images, with the thumb positioned on opposite sides. Pay careful attention to the pattern diagrams showing thumb placement to ensure you create proper left and right mittens. Many knitters mark their first mitten with a safety pin to remember which hand it fits.
Can I add a lining to these Christmas mittens?
Yes! Adding a fleece or wool lining increases warmth significantly. After completing your mittens, cut lining fabric using your mittens as templates, sew the lining pieces together, and hand-stitch them inside your finished mittens.
Start Your Christmas Knitting Journey Today
Creating Christmas mittens with Nordic patterns connects you to generations of knitting tradition while producing practical, beautiful accessories for cold weather. Whether you’re knitting for yourself or creating handmade gifts, these festive mittens bring warmth and joy to the holiday season.
The combination of classic colorwork, comfortable fit, and traditional styling makes these mittens a rewarding project for intermediate knitters looking to expand their skills. With patience and attention to detail, you’ll create heirloom-quality accessories that celebrate both Christmas and the timeless art of hand knitting.
Ready to start your next project? Explore our complete collection of holiday knitting patterns for more festive inspiration, or visit our knitting techniques library to master the skills you need for successful Christmas knitting.