Fairy Flurry Balaclava Knitting Pattern: A Complete Guide for Children’s Winter Wear
Introduction
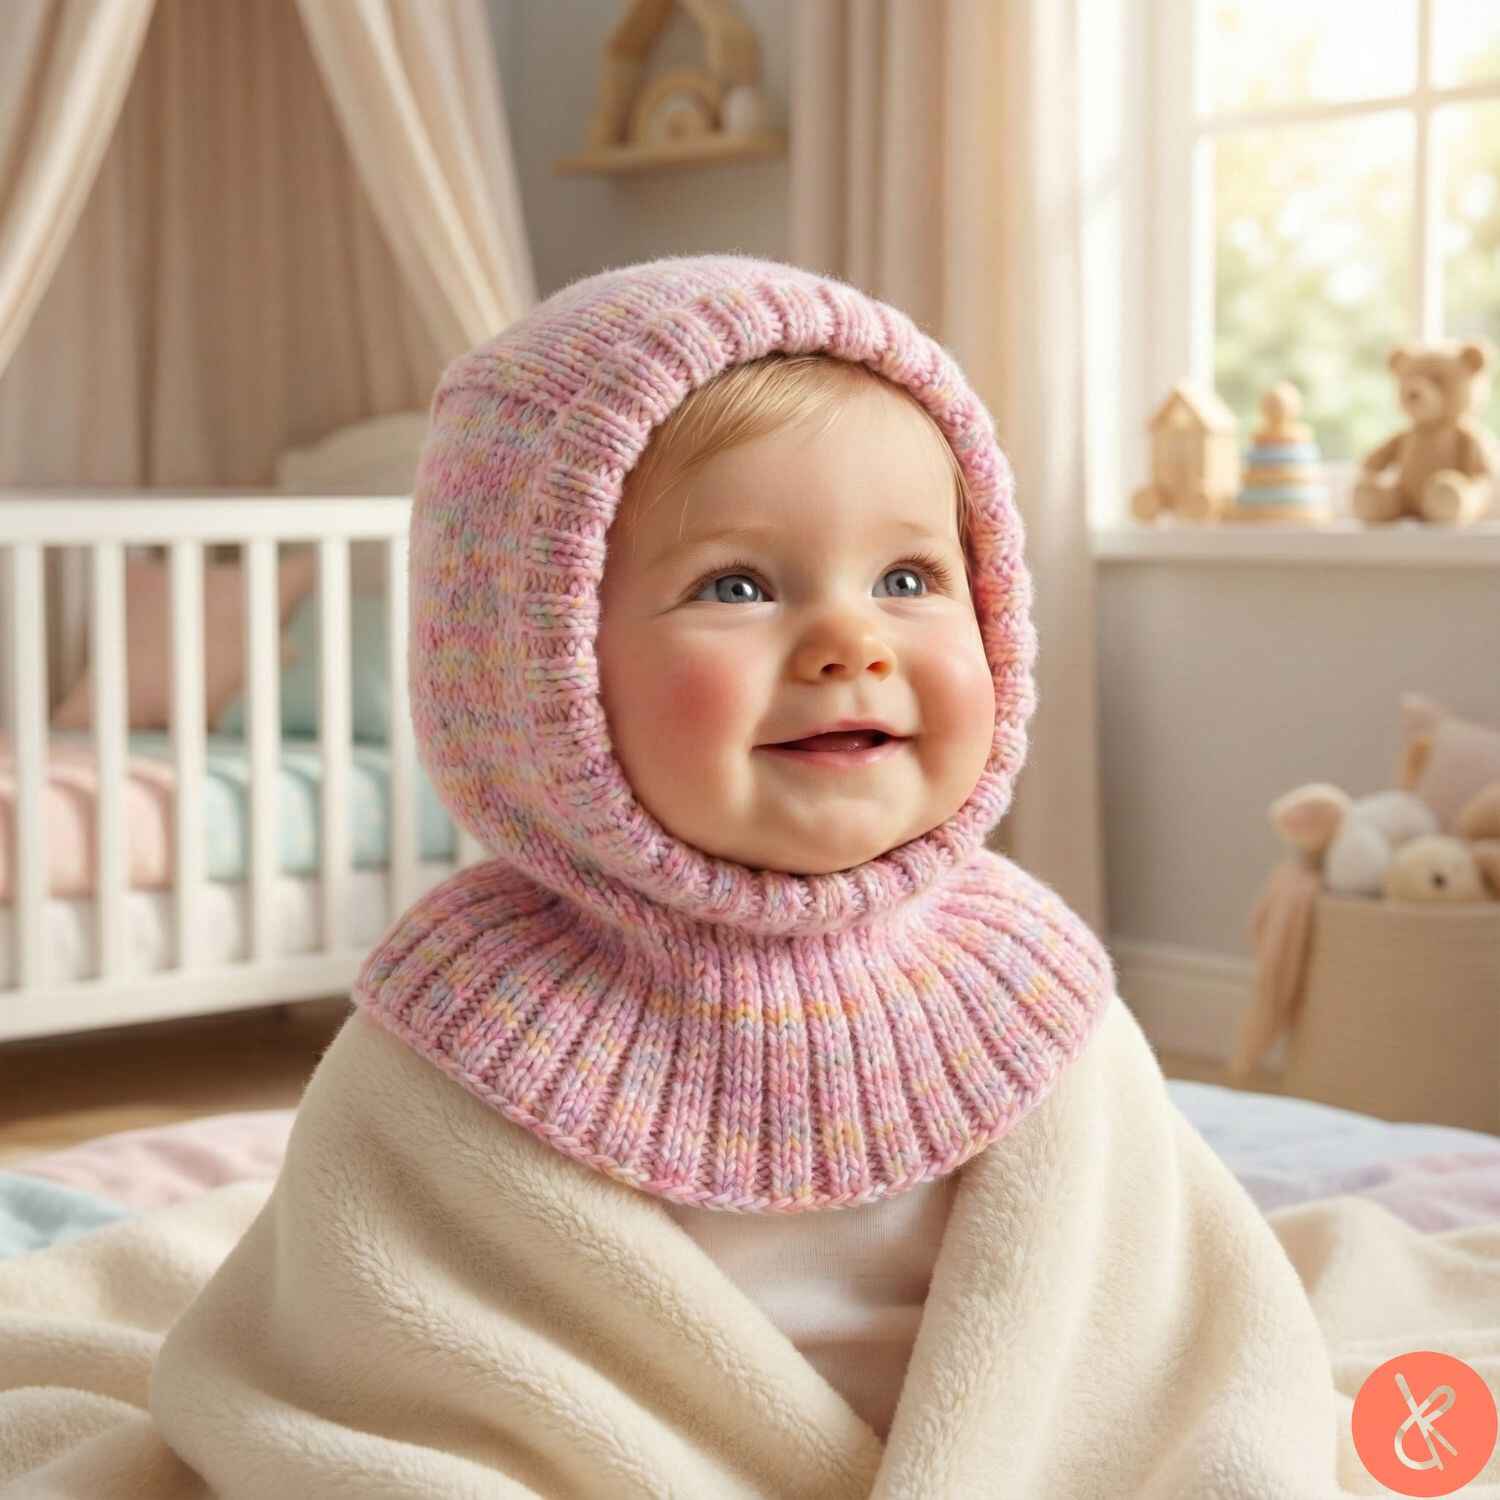
The Fairy Flurry Balaclava is a charming knitted children’s hat that combines warmth, style, and practicality. This comprehensive guide will walk you through creating this delightful winter accessory that keeps kids cozy while looking adorable. Whether you’re a beginner or experienced knitter, this pattern offers a rewarding project that results in a functional piece your children will love wearing throughout the cold months.
What is a Knitted Balaclava?
A balaclava is a form-fitting garment that covers the head, neck, and face, leaving only the eyes and sometimes the mouth exposed. Unlike traditional winter hats, balaclavas provide superior protection against cold weather by eliminating gaps where heat can escape. The Fairy Flurry Balaclava pattern creates a child-friendly version that’s both comfortable and practical for outdoor winter activities.
Materials and Tools Needed
Yarn Requirements
For this project, you’ll need DROPS Fiesta yarn in the delightful Rainbow Sprinkles colorway. This yarn belongs to group B, making it medium weight and perfect for children’s accessories. The quantity varies by size:
- Ages 2-4 years: 100g
- Ages 5/6-7/8 years: 150g
- Ages 9/10-13/14 years: 200g
Learn more about choosing the right yarn for your projects on our comprehensive yarn selection guide.
Essential Knitting Needles
You’ll require circular needles in two sizes for this balaclava pattern. The larger needles (3.5mm or US size 4) create the main body, while smaller needles (3mm or US 2.5) work the finished edge. Circular needles in 40cm and 60cm lengths work best, though you can use the magic loop technique with 80cm needles if preferred.
For more information about knitting needle types and sizes, visit our detailed guide.
Understanding Gauge and Sizing
Knitting Gauge Importance
Achieving the correct gauge is crucial for ensuring your balaclava fits properly. This pattern requires 22 stitches and 30 rows to create a 10cm square using stockinette stitch on 3.5mm needles. If your gauge differs, adjust your needle size accordingly—larger needles for fewer stitches, smaller needles for more stitches per 10cm.
Size Chart
The Fairy Flurry Balaclava accommodates head circumferences from 48cm to 57cm, covering ages 2 through 14 years. This range ensures children of various ages can enjoy this cozy accessory. Always measure your child’s head circumference before beginning to select the appropriate size.
Step-by-Step Knitting Instructions
Creating the Top Piece
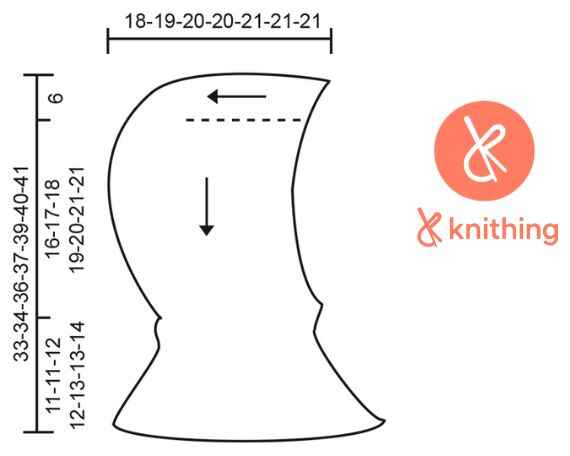
Begin by casting on 26 to 28 stitches (depending on size) using the larger circular needle. This cast-on edge forms the mid-forehead section. Work in stockinette stitch—knitting on right-side rows and purling on wrong-side rows—for approximately 12 to 15cm depending on the child’s age. This rectangular piece forms the crown of the hood.
Constructing the Hood
After completing the top piece, pick up stitches along both long edges. Start from one corner of the cast-on edge and pick up 27 to 33 stitches along one side, knit across the existing stitches, then pick up the same number along the opposite side. This creates the basic hood structure that you’ll shape through decreases.
Work several rows with edge decreases to shape the hood nicely around the face. The pattern includes specific decrease placements that create a flattering contour.
Shaping Techniques
The pattern employs strategic increases and decreases to create the perfect fit. Increases at the sides expand the hood for comfort, while mid-back decreases shape the piece to follow the head’s natural curve. These techniques ensure the finished balaclava sits comfortably without bunching or pulling.
For more advanced knitting techniques and tips, explore our tutorials section.
Working the Neck Section
Transitioning to Circular Knitting
After shaping the hood, cast on additional stitches to close the gap below the face opening. This marks the transition from flat knitting to working in the round. The neck portion uses ribbing patterns that provide stretch and warmth.
Ribbing Progression
The neck begins with simple knit-1, purl-1 ribbing, then gradually transitions to knit-2, purl-1, and finally knit-2, purl-2 ribbing. These progressive increases create a gently flared neck that allows easy on-and-off while maintaining warmth. The final neck length ranges from 11 to 14cm depending on the child’s age.
Master the art of circular knitting with our comprehensive guide.
Finishing the Face Opening
Adding the Edge
The face opening receives a special ribbed edge worked on smaller needles. Pick up approximately 104 to 128 stitches (divisible by four) around the opening and work in knit-2, purl-2 ribbing for 4 to 5cm. This creates a neat, finished look while adding extra structure to frame the face.
Professional Finishing Touches
After binding off the edge ribbing, fold it to the inside and carefully stitch it down. This doubled edge provides extra durability and a polished appearance. Ensure your stitching isn’t too tight, allowing the edge to maintain its stretch.
Discover more about finishing techniques for knitted garments in our detailed tutorial.
Tips for Success
Maintaining Even Tension
Consistent tension throughout your knitting ensures a professional-looking result. Pay special attention when picking up stitches along edges, as uneven pickup can create puckering or gaps. Count your stitches regularly to avoid mistakes that require ripping back rows of work.
Color and Customization Options
While the pattern suggests Rainbow Sprinkles colorway, feel free to customize your balaclava with any DROPS Fiesta color. Solid colors create classic looks, while variegated yarns add visual interest without extra effort. Consider your child’s favorite colors or school colors for a personalized touch.
Blocking and Care
After completing your balaclava, gentle blocking helps even out stitches and sets the final shape. Hand wash in cool water with mild soap, then lay flat to dry. Proper care ensures your handmade creation lasts through many winter seasons.
Learn more about caring for handknit items to extend their lifespan.
Benefits of Handknit Balaclavas
Superior Warmth
Handknit balaclavas provide exceptional insulation compared to mass-produced alternatives. The natural fibers trap air, creating a warm barrier against cold winds. The seamless construction around the neck eliminates gaps where warmth escapes.
Perfect Fit
Making your own balaclava allows you to customize the fit precisely to your child’s measurements. You can adjust lengths, widths, and proportions to create the most comfortable garment possible. This personalization is especially valuable for children who find standard sizes uncomfortable.
Sustainable Fashion Choice
Creating handmade accessories reduces reliance on fast fashion while teaching valuable skills. Knitting your own items means controlling material quality and ensuring ethical production. Plus, handknit items often become cherished heirlooms passed between family members.
Explore more about sustainable knitting practices on our blog.
Troubleshooting Common Issues
Dealing with Uneven Edges
If your edges appear wavy or tight, check your tension when picking up stitches. Picking up too tightly creates puckering, while loose pickup causes flaring. Practice on a swatch first if you’re new to this technique.
Size Adjustments Mid-Project
If you realize partway through that the size isn’t quite right, don’t panic. For minor adjustments, you can often modify the neck length or add extra rows to the hood. For significant changes, it’s better to restart with the correct size to ensure proper fit.
Fixing Mistakes
Everyone makes mistakes while knitting. Learn to identify errors early by checking your work every few rows. Dropped stitches can be recovered with a crochet hook, while incorrect stitch counts may require partial unraveling. Keep a positive attitude—mistakes are learning opportunities.
Find solutions to common knitting problems in our help center.
Styling Your Fairy Flurry Balaclava
Coordinating Winter Outfits
The Fairy Flurry Balaclava pairs beautifully with winter coats, snow pants, and mittens. Consider knitting matching mittens or scarves using the same yarn for a coordinated set. The Rainbow Sprinkles colorway complements most winter clothing colors.
Active Wear Applications
This balaclava excels for outdoor activities like skiing, sledding, ice skating, and winter hiking. The full coverage protects against windburn and frostbite while allowing freedom of movement. Unlike scarves, balaclavas stay securely in place during active play.
Everyday Winter Wear
Beyond sports, this balaclava serves perfectly for daily cold-weather activities like walking to school, playing in the yard, or waiting at bus stops. The comfortable fit means children actually want to wear their protective gear.
Advanced Variations to Try
Experimenting with Stitch Patterns
Once you’ve mastered the basic pattern, consider incorporating decorative stitches. Cable panels, seed stitch sections, or colorwork motifs can personalize your balaclava. Just maintain the gauge to ensure proper fit.
Adding Embellishments
Pom-poms, tassels, or embroidered details can make each balaclava unique. Consider adding your child’s initial or favorite character. Remember that embellishments should be securely attached and comfortable against the skin.
Creating Adult Sizes
The pattern can be adapted for adult wearers by increasing stitch counts proportionally. Calculate based on adult head measurements and adjust accordingly. Adult balaclavas make excellent gifts for outdoor enthusiasts and winter sports participants.
Get inspired by our collection of knitting pattern modifications.
Frequently Asked Questions
How long does it take to knit a balaclava?
The time required varies based on your knitting speed and experience level. Most knitters complete this project in 8 to 15 hours spread over several days. The straightforward construction makes it an excellent weekend project or week-long endeavor for evening knitting sessions.
Can I use different yarn weights?
While the pattern specifies medium-weight yarn, you can substitute other weights with appropriate adjustments. Bulkier yarn requires fewer stitches and creates a warmer balaclava, while finer yarn needs more stitches for proper coverage. Always knit a gauge swatch when substituting yarns to ensure correct sizing.
Is this pattern suitable for beginners?
This pattern suits confident beginners who understand basic knitting techniques. You should be comfortable with casting on, knitting, purling, increasing, decreasing, picking up stitches, and binding off. The pattern provides clear instructions for each step, making it achievable with patience and attention to detail.
How do I ensure the balaclava fits properly?
Accurate measurements are essential for proper fit. Measure your child’s head circumference at the widest point and compare with the pattern’s size chart. When in doubt, choose the larger size—children grow quickly, and a slightly loose balaclava is more comfortable than one that’s too tight.
Can I make the face opening larger or smaller?
Yes, you can adjust the face opening by altering the number of cast-on stitches before working the neck. Fewer stitches create a larger opening, while more stitches reduce the opening size. Make changes in multiples of four to maintain the ribbing pattern.
What’s the best way to store handknit balaclavas?
Store your finished balaclava folded loosely in a drawer or bin away from direct sunlight. Avoid hanging, which can stretch the knitting. During off-season storage, include cedar blocks or lavender sachets to deter moths. Ensure the item is completely clean before long-term storage.
How do I wash a handknit balaclava?
Hand washing in cool water with gentle soap preserves handknit items best. Gently squeeze out excess water without wringing, then lay flat on a towel to dry. Avoid machine washing and drying, which can cause felting and shrinkage. For frequently worn items, wash after every 3-4 wears.
Can I sell items made from this pattern?
Pattern copyright typically belongs to the designer. Check the original pattern’s terms regarding commercial use of finished items. Many designers allow small-scale sales while prohibiting mass production or pattern redistribution. Always credit the pattern designer when selling finished items.
Conclusion
The Fairy Flurry Balaclava represents the perfect combination of practicality and charm in children’s winter accessories. This pattern offers clear instructions that guide knitters through creating a functional, beautiful garment that children will actually want to wear. The progressive ribbing, thoughtful shaping, and comfortable fit make this project worthwhile for knitters of various skill levels.
By following this comprehensive guide and utilizing the techniques discussed, you’ll create a balaclava that keeps your child warm through countless winter adventures. The satisfaction of seeing your handmade creation in use makes every stitch worthwhile. Whether you’re knitting for your own children, as gifts, or for charity, this pattern delivers excellent results.
Ready to start your next knitting project? Explore our complete pattern library for more inspiration, or visit our knitting community forum to share your finished projects and connect with fellow knitters. Happy knitting!