How to Knit a Mini Christmas Tree: Complete Step-by-Step Pattern
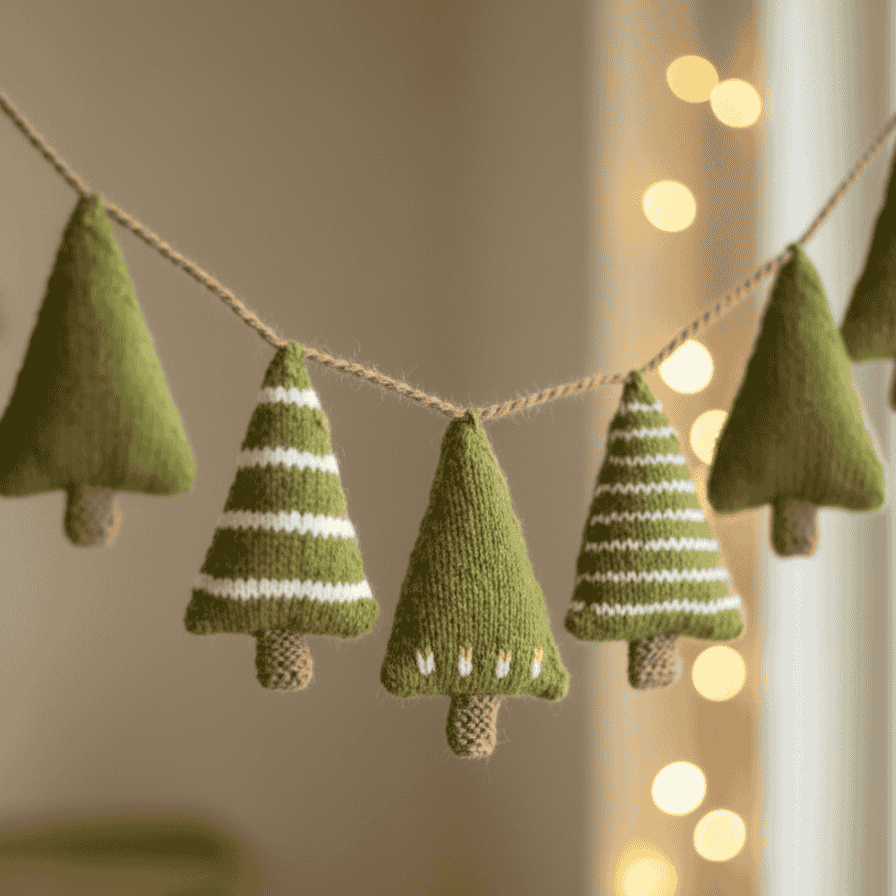
Looking for the perfect handmade holiday decoration that’s both charming and achievable? These miniature knitted Christmas trees are an absolute delight to make! Standing just 12 cm (4¾”) tall, they’re the ideal size for mantels, desks, or as thoughtful handmade gifts.
What makes this pattern special? You get five different design variations to choose from – ranging from classic solid colors to festive patterns with candle flames and decorative garlands. Even better, each little tree knits up in just 2-3 hours, making them perfect for weekend crafting or holiday knitting marathons.
Whether you’re an intermediate knitter looking for a quick seasonal project or planning to create an entire forest of mini trees, this comprehensive guide walks you through every step. Let’s get started!
Quick Pattern Overview
- Finished Height: 12 cm (4¾”) excluding trunk
- Finished Width: 9 cm (3½”) at base
- Skill Level: Intermediate
- Time to Complete: 2-3 hours per tree
- Techniques Used: In-the-round knitting, colorwork, decreasing, grafting
- Weight per Tree: Approximately 8g (without stuffing)
Materials & Supplies
Yarn Requirements
Any DK/Light Worsted weight yarn (Yarn Group B):
- Main Color (Olive): 100g – color 0705 olive
- Contrast Color (Off White): 50g – color 0100 off white (for decorative colorwork patterns)
- Trunk Color (Almond): 50g – color 9024 almond (also used for hanging cord)
- Accent Color (Goldenrod): Small amount – color 2923 goldenrod (optional, for candle flame details)
Yarn Substitution Tip: Any DK-weight yarn that achieves the gauge will work. Look for yarns labeled as “light worsted” or “8-ply.”
Needles & Notions
Essential:
- Set of 5 double-pointed needles, size 3mm (US 2.5)
- 2 stitch markers
- Yarn needle (blunt tip for grafting)
- Scissors
- Wadding or polyester fiberfill stuffing
Gauge & Sizing
Critical Gauge Information
23 stitches × 32 rows = 10 × 10 cm (4″ × 4″) in stockinette stitch
Gauge is crucial for this project! Even small variations will noticeably affect your tree’s final size and proportions.
How to Check Your Gauge:
- Cast on 30 stitches with your chosen needles and yarn
- Work in stockinette stitch for 40 rows
- Bind off and block your swatch lightly
- Measure a 10cm square in the center of your swatch
Adjusting Your Gauge:
- Too many stitches per 10cm? → Use larger needles (try 3.25mm/US 3)
- Too few stitches per 10cm? → Use smaller needles (try 2.75mm/US 2)
Pattern Notes & Techniques
Understanding the Construction
This tree is worked bottom-up in the round using double-pointed needles. The cone shape is created naturally through strategic decreases placed at two side “seams” (marked with stitch markers). After completion, the bottom is partially grafted closed, leaving openings for the trunk which is then worked flat and sewn.
Key Techniques Explained
Garter Stitch (worked flat):
Knit every row (both right side and wrong side rows).
Stockinette Stitch in the Round:
Knit every stitch, every round (no purling needed).
Colorwork Method:
This pattern uses stranded colorwork (Fair Isle technique). Carry the unused color loosely across the back of work to maintain elasticity.
About the Pattern Diagrams
This pattern includes five different design variations shown in diagrams A.1 through A.5:
- Diagram A.1: Classic solid olive tree with clean shaping
- Diagram A.2: Tree with horizontal off-white decorative bands
- Diagram A.3: Tree with diagonal off-white garland pattern
- Diagram A.4: Tree with scattered off-white ornament spots
- Diagram A.5: Tree with goldenrod candle flame accents
Diagram Symbol Key:
- Olive square = knit with olive
- Off white square = knit with off white
- Goldenrod square = knit with goldenrod
- Diagonal line = K2tog (knit 2 together, right-leaning decrease)
- Reverse diagonal = K2tog tbl (knit 2 together through back loops, left-leaning decrease)
Each diagram shows the complete pattern from cast-on to final 6 stitches, with all decrease rounds clearly marked.
Step-by-Step Instructions
Part 1: Knitting the Tree Body
Cast On & Set Up
- Using double-pointed needles size 3mm (US 2.5) and olive yarn, cast on 42 stitches using your preferred method (long-tail cast-on recommended).
- Distribute stitches across 4 double-pointed needles as follows:
- Needle 1: 10 stitches
- Needle 2: 11 stitches
- Needle 3: 10 stitches
- Needle 4: 11 stitches
- Join to work in the round:
- Check that stitches are not twisted
- Place your first stitch marker at the beginning of the round (between needles 4 and 1)
- Knit to stitch 21
- Place your second stitch marker (between needles 2 and 3)
You now have 21 stitches between each marker, dividing your round perfectly in half. These markers indicate where your side decreases will occur.
Working the Body
- Choose your design: Select one of the five diagrams (A.1 through A.5) to follow for your tree.
- Begin knitting in the round:
- Work in stockinette stitch (knit every stitch)
- Follow your chosen diagram for colorwork
- The diagram pattern repeats twice per round (once from marker to marker, then again from second marker back to first marker)
- Working the decreases:
- Decreases occur on both sides of both markers (4 decreases per decrease round)
- The diagram shows exactly which rounds include decreases
When you reach a decrease round:
- Knit to 2 stitches before the first marker
- K2tog (knit 2 stitches together) – this creates a right-leaning decrease
- Slip marker
- K2tog tbl (knit 2 together through back loops) – this creates a left-leaning decrease
- Continue in pattern to 2 stitches before second marker
- Repeat the decrease sequence (K2tog, slip marker, K2tog tbl)
- Complete the round
- Continue following your diagram until you’ve completed all rounds.
Colorwork Tip: When carrying yarn across the back, spread your stitches on the right needle every few stitches to ensure the float isn’t too tight.
Finishing the Top
- When your diagram is complete, 6 stitches remain on your needles.
- Close the top:
- Cut yarn, leaving a 20cm (8″) tail
- Thread the tail onto your yarn needle
- Pass the needle through all 6 remaining stitches
- Slide stitches off the knitting needles
- Pull the yarn tail snug to gather the top closed
- Pass through the center opening once more for security
- Weave the end to the inside
Checkpoint: Your tree body is now complete and measures approximately 12 cm (4¾”) in height.
Part 2: Assembly
Stuffing the Tree
- Add wadding through the bottom opening:
- Start by pushing small amounts of stuffing to the top of the tree
- Work your way down, distributing evenly
- Aim for firm but not stretched – you should still see clear stitch definition
- Shape as you stuff:
- The tree should have a gentle cone shape
- Avoid lumps by adding small amounts at a time
- The bottom edge should remain relatively flat
Grafting the Bottom
This step creates a flat, stable base while leaving openings for the trunk.
- Orient the tree:
- Lay the tree flat on your work surface
- Position the two stitch markers at the left and right side edges
- You should now see a clear “front” and “back” section at the bottom
- Graft the sides:
- Thread a length of matching olive yarn onto your yarn needle
- Starting at one marker, use Kitchener stitch or mattress stitch to graft 8 stitches together along the bottom edge
- Move to the opposite marker and graft 8 stitches together on that side as well
- Check your work:
- You should now have 5 unjoined stitches at the center front
- And 5 unjoined stitches at the center back
- These 10 stitches (5 front + 5 back) will become the trunk attachment points
- Cut yarn and weave in the end securely inside the tree.
Checkpoint: Your tree now stands upright with a stable base and two small openings where the trunk will attach.
Part 3: Adding the Trunk
Picking Up Stitches
- Prepare your trunk yarn:
- Cut a comfortable working length of almond color yarn (approximately 1 meter)
- Thread onto your yarn needle
- Pick up stitches for the trunk:
- Working from right to left on the front opening, pick up and knit 1 stitch in each of the 5 unjoined stitches
- Continue around to the back opening
- Pick up and knit 1 stitch in each of the 5 unjoined back stitches
- You now have 10 stitches total on your needle
Knitting the Trunk
- Work in garter stitch (knit every row) back and forth:
- Row 1 (WS): Knit 10
- Row 2 (RS): Knit 10
- Continue in this manner until trunk measures 2½ cm (1″)
- This should be approximately 16-18 rows
- Bind off all stitches loosely.
Tip: Keep your garter stitch tension relaxed – too-tight stitches will make the trunk curl.
Seaming the Trunk
- Fold the trunk in half lengthwise with wrong sides together (the purl bumps should be on the outside).
- Sew the side seam:
- Using mattress stitch or whip stitch, sew from top to bottom edge
- Keep stitches small and even
- Sew the bottom edge closed:
- Use mattress stitch to close the bottom of the trunk
- This should create a flat, neat base for the tree to stand on
- Important: Do NOT stuff the trunk – leave it flat for stability.
- Weave in all ends securely.
Checkpoint: Your tree now has a complete, attached trunk and can stand independently!
Part 4: Creating the Hanging Loop
This creates a beautifully twisted cord for hanging your tree as an ornament.
- Cut a strand of almond yarn measuring 3 meters (approximately 10 feet) in length.
- Create the twist:
- Secure one end (tape it to a table, or have someone hold it)
- Hold the other end and twist the yarn tightly in one direction
- Keep twisting until the yarn begins to kink and wants to twist back on itself
- The strand should feel quite taut
- Create the cord:
- Keep the strand under tension
- Fold the twisted strand in half, bringing the two ends together
- Slowly release the tension while holding both ends
- The strand will automatically twist back on itself, creating a neat cord
- Smooth the cord with your fingers to even out the twist
- Secure and attach:
- Tie a knot at the folded end to prevent unraveling
- Thread the knotted end through your yarn needle
- Pass the needle through the top center of your tree from top to bottom
- Pull through, leaving a loop at the top for hanging
- Secure the ends inside the tree or trim and weave them in
Customization Ideas & Variations
Design Modifications
Size Variations:
- Larger tree: Use worsted weight yarn and 4mm needles
- Smaller tree: Use sport weight yarn and 2.5mm needles
- Tree family: Make all 5 diagram patterns for variety
Decorative Additions
Embellishments:
- Tiny seed beads sewn on as ornaments
- Embroidered star on top using metallic thread
- Small jingle bell attached to bottom branch
- Sequins or tiny buttons as decorations
- French knots in contrasting colors as ornament spots
Alternative Color Schemes:
- Snowy white: White main color with silver accents
- Blue spruce: Teal with gold ornaments
- Pink fantasy: Pink with white “snow”
- Traditional: Dark green with red and gold
- Rustic: Natural beige with brown accents
Display Ideas
- Mini forest centerpiece: Group 3-5 trees of varying heights
- Place card holders: Add name tags for holiday dinner
- Advent calendar: Make 24 mini trees, one for each day
- Garland: String multiple trees with twine between them
- Gift toppers: Attach to wrapped presents instead of bows
- Wreath accent: Wire several trees onto a wreath base
Troubleshooting Common Issues
Problem: Tree leans to one side
Solution: Ensure decreases are evenly spaced and worked on both markers. Check that stuffing is distributed evenly.
Problem: Tree won’t stand upright
Solution: Make sure the trunk bottom is sewn completely flat. The grafted base should create a stable platform.
Problem: Colorwork puckers
Solution: Your floats (carried strands) are too tight. Practice spreading stitches on the right needle before catching the carried color.
Problem: Top opening won’t close neatly
Solution: Thread your yarn through the remaining stitches twice before pulling tight. Weave the end through the center one more time for security.
Problem: Trunk attaches crookedly
Solution: When picking up stitches, ensure you’re centered on both front and back openings. Count carefully to maintain symmetry.
Frequently Asked Questions
Q: How many trees can I make from one set of yarn?
A: From 100g of main color, you can make approximately 12-13 solid trees, or 8-10 with colorwork.
Q: Do I need to block the finished tree?
A: No, blocking isn’t necessary for this project since it’s stuffed and three-dimensional.
Q: Can beginners make this pattern?
A: This is rated intermediate because it requires comfort with DPNs, colorwork (for patterned versions), and grafting. Confident beginners could manage the solid version (Diagram A.1).
Q: How do I clean the finished tree?
A: Spot clean gently with damp cloth if needed. Don’t submerge in water as it contains wadding.
Q: Can I make this tree without the colorwork?
A: Absolutely! Follow Diagram A.1 for a simple, solid-colored tree that skips the colorwork entirely.
To find more plushies patterns click here