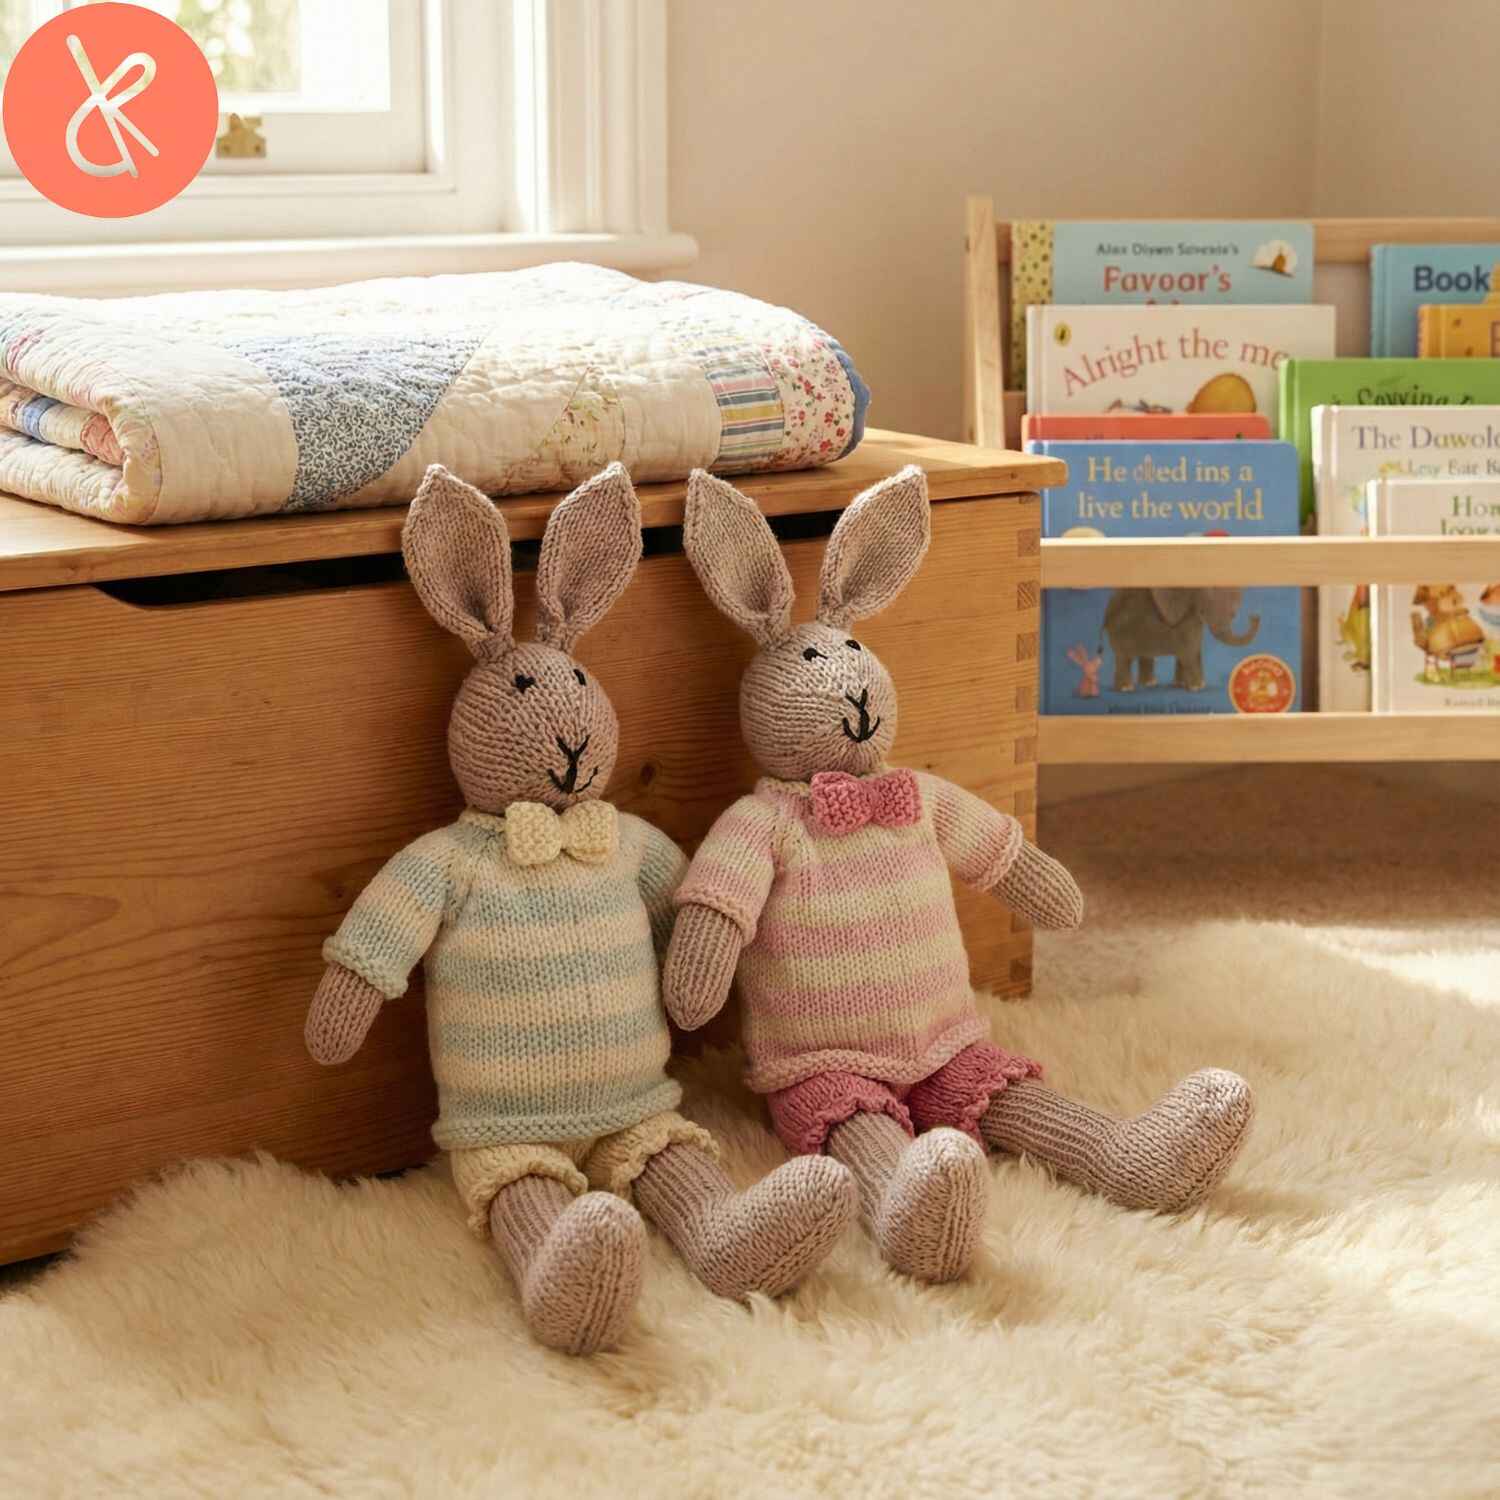
Mrs. Bunny Knitting Pattern: Complete Guide to Creating an Adorable Toy Bunny
Introduction
Creating handmade toys brings joy to both the maker and recipient. The Mrs. Bunny knitting pattern offers crafters a delightful project that results in a charming 30 cm tall toy bunny complete with pants, a striped jumper, and an adorable bow. Whether you’re a seasoned knitter or looking to expand your toy-making skills, this comprehensive guide will walk you through everything you need to know about the Mrs. Bunny knitting pattern.
What is the Mrs. Bunny Knitting Pattern?
The Mrs. Bunny knitting pattern (design number bm-065-by) is a delightful knitted toy pattern that creates a fully dressed rabbit approximately 12 inches tall, including the ears. This intermediate-level pattern uses Baby Merino yarn and produces a soft, huggable companion perfect for children or as a decorative piece for bunny enthusiasts.
The pattern includes detailed instructions for creating the complete bunny body, removable clothing including striped pants with delicate lace trim, a coordinating striped jumper with raglan sleeves, and finishing touches like embroidered facial features and a charming bow accessory.
Materials Needed for Mrs. Bunny
Yarn Requirements
For this project, you’ll need Baby Merino yarn in the following colors and quantities:
- 50g in off white (color no. 02)
- 50g in pink (color no. 07)
- 50g in light beige (color no. 23)
- 50g in light pink (color no. 05)
- Small amount of black yarn for facial features
This yarn falls into Group A weight category, making it perfect for toy projects that require both durability and softness. If you’re interested in learning more about yarn weights and substitutions, understanding these classifications will help you adapt patterns to your available materials.
Tools and Supplies
To complete your Mrs. Bunny, gather these essential tools:
- Double pointed needles size 3mm (US 2.5)
- Crochet hook size C (3mm) for lace edging
- One light-colored wood button (no. 503)
- Polyester stuffing for filling
- Tapestry needle for seaming and embroidery
- Stitch markers
- Scissors
Having quality tools makes the knitting process more enjoyable. Check out our guide on essential knitting tools for recommendations on building your craft toolkit.
Understanding the Pattern Gauge
Achieving the correct gauge ensures your Mrs. Bunny turns out the proper size. This pattern requires 24 stitches by 32 rows to measure 4 inches by 4 inches (10cm x 10cm) in stockinette stitch using 3mm needles.
Taking time to knit a gauge swatch before starting prevents disappointment later. If your gauge is too loose, try smaller needles. If too tight, size up. For more detailed information about measuring and achieving proper gauge, refer to our comprehensive tutorial.
Step-by-Step Construction Guide
Starting with the Magic Circle Technique
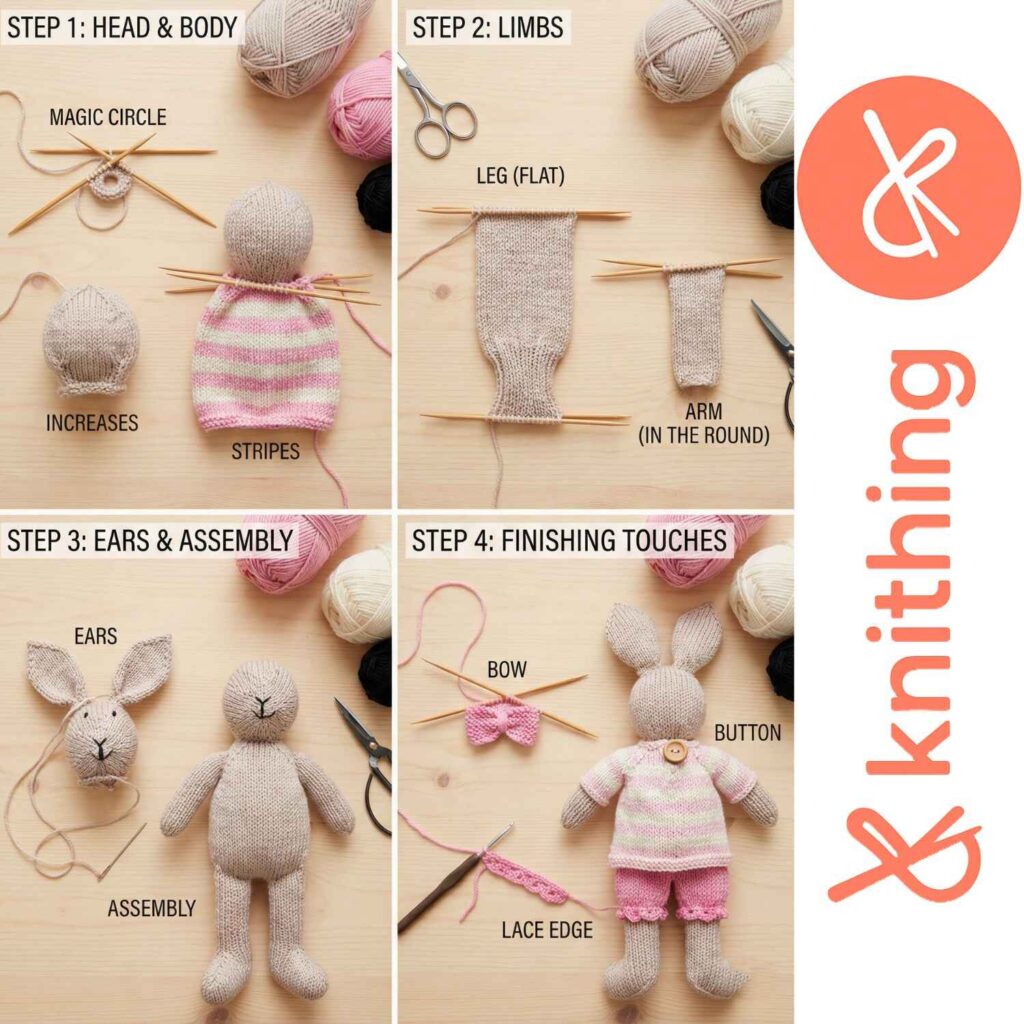
The Mrs. Bunny pattern begins with a magic circle, an essential technique for creating seamless rounds without a center hole. This method works perfectly for the bunny’s head, starting with just six stitches that gradually increase to form the rounded shape.
The magic circle involves creating a loop around your index finger, then working stitches through this loop before tightening the yarn end to close the center completely. Master this technique for professional-looking results in your circular knitting projects.
Creating the Head
The head construction involves working in the round from the snout backward, creating a three-dimensional shape through strategic increases and decreases. Beginning with the magic circle, you’ll increase every other round until reaching 42 stitches at the widest point, then decrease symmetrically to create the back of the head.
Proper stuffing technique makes a significant difference in the final appearance. Fill the head firmly but not overly tight, ensuring even distribution for a smooth, professional finish.
Crafting the Ears
Each ear requires casting on eight stitches and working in the round. The ears feature increases at the beginning that create their distinctive elongated shape, followed by several inches of even knitting, then decreases that taper to the rounded tips.
A clever construction detail involves creating a pleat at the ear base by folding the sides toward the center, giving the ears natural dimension and preventing them from appearing flat against the head.
Building the Body
The body construction mirrors the head technique, starting with fewer stitches at the neck and increasing to create the rounded torso shape. After reaching full width, you’ll work several inches even before beginning the pink section that forms the pants.
The transition from light beige body to pink pants includes a purl round that creates a visible dividing line, adding a charming detail to the finished toy.
Forming the Legs and Arms
Legs begin flat and work upward, featuring an interesting construction where the foot opening is created mid-piece through binding off stitches. This opening is later sewn closed to form the foot shape. The pink pants section includes increases that create a gathered, baggy appearance at the top.
Arms use a simpler tube construction, working flat with edge stitches that create neat seams when sewn together. Positioning arms at shoulder level rather than mid-body gives Mrs. Bunny better proportions.
Creating the Striped Jumper
Body of the Jumper
The jumper works in the round using alternating four-row stripes of light pink and off white, creating a classic nautical-inspired look. Beginning with a rolled edge created through purl and knit rounds, the piece works upward until reaching the armholes.
Understanding colorwork techniques helps maintain even tension when changing colors frequently in striped patterns.
Raglan Sleeve Construction
The sleeves work separately in the round, matching the body’s stripe pattern. These pieces join the body at the yoke, where raglan decreases shape the neckline in a flattering diagonal line.
Raglan construction creates a comfortable fit and professional appearance, making this technique valuable for many sweater knitting projects.
Finishing the Yoke
After joining sleeves and body, strategic decreases at four points create the signature raglan lines while shaping the neckline. The pattern switches to working flat at this point, with edge stitches creating a neat opening at the center back.
The neckline finishes with a simple garter stitch edging that prevents curling and provides structure.
Adding Decorative Details
Embroidering Facial Features
Creating expressive facial features brings Mrs. Bunny to life. Using black yarn, embroider two round eyes, a small triangular nose, and a simple mouth. Placement affects personality—experiment with positioning before permanently stitching.
For guidance on embroidery techniques for knitted items, explore various stitch options that work well on knitted fabric.
Crocheting the Lace Trim
The delicate lace edging around the pant legs adds feminine charm. This simple crochet pattern creates small loops through single crochet and chain stitches worked around the pink section of each leg.
Even if you’re primarily a knitter, learning basic crochet stitches expands your finishing options for knitted projects.
Making the Bow
The bow accessory adds a final touch of personality. Created from a small rectangle of garter stitch sewn into a ring, the center is wrapped with yarn to create the characteristic bow shape. Attach it to the jumper neckline for a classic look.
Tips for Success
Maintaining Consistent Tension
Consistent tension throughout your project ensures even stitches and professional results. This becomes especially important in toy knitting where lumpy or loose areas become more visible.
Pay attention to tension when working increases and decreases, as these areas tend to loosen. Our guide to maintaining even tension offers exercises and tips for improvement.
Stuffing Techniques
Proper stuffing makes the difference between a lumpy toy and a professional-looking creation. Use small amounts at a time, distributing evenly throughout each section. Avoid overstuffing, which distorts stitches and creates an unnatural appearance.
The legs require less stuffing than the head and body, allowing them to bend naturally at the hip joint for posing the finished bunny.
Seaming and Finishing
Invisible seaming creates professional results in toy construction. Use mattress stitch for body seams, working through the front loops of edge stitches for neat, flat joins.
Weave in ends securely, as toys receive more handling than garments. Our tutorial on finishing techniques covers various methods for different situations.
Customization Ideas
Color Variations
While the original pattern uses soft pastels, Mrs. Bunny adapts beautifully to any color palette. Consider creating seasonal versions with autumn oranges and browns, winter whites and grays, or vibrant rainbow combinations.
Explore color theory for knitters to create harmonious combinations that elevate your projects.
Size Adjustments
Changing needle size and yarn weight creates Mrs. Bunny in different dimensions. Using worsted weight yarn with larger needles produces a bigger bunny, while fingering weight creates a miniature version.
Remember that changing size affects yarn requirements. Calculate approximate needs by considering the ratio between your gauge and the pattern gauge.
Adding Accessories
Beyond the included jumper and pants, consider knitting additional outfits. A simple dress, coat, or hat allows for outfit changes and increased play value. Small accessories like a knitted bag or basket add storytelling possibilities.
Common Challenges and Solutions
Working with Double Pointed Needles
Double pointed needles can feel awkward initially, especially in small circumferences. Practice maintaining even tension across needle changes to prevent laddering, visible gaps between needles.
Consider using the magic loop method with circular needles as an alternative if you prefer. Learn more about different circular knitting methods to find your preferred technique.
Shaping the Head Correctly
Achieving proper head shaping requires following increase and decrease sequences precisely. Count stitches regularly to catch errors before they become significant problems requiring extensive unknitting.
Use stitch markers to track pattern repeats and section beginnings, making it easier to maintain your place in the pattern.
Assembling Multiple Pieces
Keeping track of all the small components requires organization. Label completed pieces as you finish them, and lay everything out before beginning assembly to ensure nothing gets overlooked.
Take photos during construction to reference later if creating multiple bunnies or adapting the pattern.
Caring for Your Finished Bunny
Washing Instructions
Baby Merino yarn allows for gentle washing, making Mrs. Bunny practical for children. Hand wash in cool water with mild soap designed for wool, avoiding agitation that causes felting.
Reshape while damp and lay flat to dry away from direct heat. Remove the jumper before washing for easiest cleaning.
Storage Recommendations
Store completed toys in breathable fabric bags rather than plastic, preventing moisture buildup that encourages mildew. Keep away from direct sunlight to prevent color fading, especially in pastel shades.
Repair and Maintenance
Inspect seams periodically, reinforcing any areas showing wear. Small repairs made promptly prevent larger problems developing. Keep leftover yarn for future repairs, as dye lots vary making exact matching difficult later.
Pattern Variations Worth Trying
Once comfortable with the basic Mrs. Bunny pattern, experiment with modifications. Create Mr. Bunny by eliminating the bow and choosing masculine color schemes. Add a fluffy pompom tail for extra detail. Experiment with different clothing styles to build an entire bunny family with distinct personalities.
Document your modifications for future reference. Consider sharing successful variations with the knitting community to inspire other crafters.
FAQ Section
What skill level is required for the Mrs. Bunny pattern?
The Mrs. Bunny knitting pattern suits intermediate knitters comfortable with working in the round, increasing and decreasing, and basic seaming. While the pattern includes clear instructions, beginners may find the construction challenging. Consider starting with simpler flat-knit toys if you’re new to knitting before tackling this three-dimensional project.
How long does it take to knit Mrs. Bunny?
Completion time varies based on knitting speed and experience level, but most crafters finish Mrs. Bunny in 15-25 hours spread across several sessions. The body and head work relatively quickly, while the clothing and detail work require more time. Breaking the project into manageable sections over a week or two makes it feel less overwhelming.
Can I use different yarn than Baby Merino?
Yes, you can substitute any yarn from Group A (sport weight) that achieves the correct gauge. Consider softness and washability when choosing alternatives, especially for toys intended for children. Popular substitutions include other merino blends, cotton blends, or acrylic yarns. Always knit a gauge swatch with your chosen yarn to ensure proper sizing.
Is Mrs. Bunny safe for small children?
With proper construction, Mrs. Bunny makes a safe toy for children over three years old. Ensure all embroidered features are securely stitched, use child-safe stuffing, and sew the button firmly. For babies and toddlers, consider omitting the button and using embroidered or felt features instead of button eyes to eliminate choking hazards.
What if my gauge doesn’t match exactly?
If your gauge differs slightly from the pattern specifications, your finished bunny will be proportionally larger or smaller. This isn’t necessarily problematic unless you need a specific size. Adjust your needle size up or down to match gauge more closely. Remember that gauge affects yarn consumption, so you may need more or less yarn than specified.
Can I sell bunnies made from this pattern?
Copyright and usage rights vary by pattern designer. Check the original pattern copyright notice for information about selling finished objects. Many patterns allow selling finished items with appropriate credit to the designer, while others restrict commercial use. Always respect designers’ intellectual property rights.
How do I prevent holes when increasing?
The pattern instructs working yarn overs twisted on the following round to prevent holes. Insert your needle through the back leg of the yarn over rather than the front, which closes the gap. Practice this technique on a swatch if you’re unfamiliar with twisted stitches to build confidence before working on your bunny.
What’s the best type of stuffing to use?
Polyester fiberfill designed specifically for toys provides the best results. It’s washable, hypoallergenic, and maintains shape well over time. Avoid using cotton batting or wool roving as these materials clump when washed. Distribute stuffing evenly in small amounts rather than large clumps for smooth, professional results.
Can I make Mrs. Bunny without the clothes?
Absolutely! The bunny body works as a standalone toy without the jumper and pants. This simplifies the project significantly while still creating an adorable toy. You might add simple embellishments like a ribbon bow or collar instead of the full clothing pieces.
How do I fix mistakes several rows back?
For small mistakes like a missed increase or decrease, you can often fix them by carefully unknitting back to the error. For mistakes many rows back, consider using a crochet hook to “drop down” and fix the affected stitches individually rather than ripping out large sections of work. Evaluate whether the mistake significantly impacts the appearance before deciding to fix it.
Conclusion
The Mrs. Bunny knitting pattern offers crafters a rewarding project that combines technical skill development with creative satisfaction. From mastering the magic circle technique to creating delicate lace trim and assembling multiple components into a cohesive toy, this pattern teaches valuable skills applicable to many future knitting projects.
Whether creating Mrs. Bunny as a cherished gift, a nursery decoration, or a personal challenge, the process rewards patience and attention to detail with a charming handmade treasure. The completed bunny represents hours of careful work and carries the unique character that only handmade items possess.
Ready to start your own Mrs. Bunny? Gather your materials, review the techniques, and enjoy the meditative rhythm of creating something beautiful stitch by stitch. For more knitting patterns and tutorials, explore the extensive resources available at Knithing.com.